Contact Properties can be very useful in your work with visitors or customers, and allow a lot of flexibility for handling information. They are available on every Tidio plan, including Free.
Your agents can fill them in during a conversation, your flows and Lyro (the AI agent) can save what customers tell them, and you can bring them in with a contact import.
In this article, you'll learn:
- What Contact Properties are
- How to set new Contact Properties
- How to use Contact Properties in flows
- How to add Contact Properties manually during chats
- How Lyro uses Contact Properties
- How to use Lead Scoring
- How to merge multiple Contact Property values into one new value
What are Contact Properties?
Contact Properties are pieces of data you can assign to your visitors and customers. They can be filled in:
- manually by your agents, in the Inbox,
- by your flows,
- by Lyro, in its Procedures,
- by a contact import from a CSV file,
- from your website, by your developer, with the Widget SDK.
The Contact Properties assigned to the contacts are then stored in the Contacts list, where you can show them as columns, filter by them and export them. You can also use those data later on for Condition nodes in flows so that your flows can be even more personalized.
Each property has one of five types: Text, Email, Number, Phone Number or URL.
Set new Contact Properties
To create a new Contact Property, go to the Settings > Fields section in your Tidio admin panel:
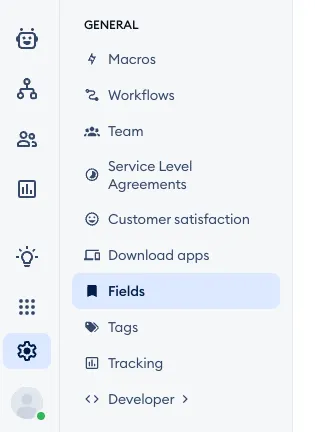
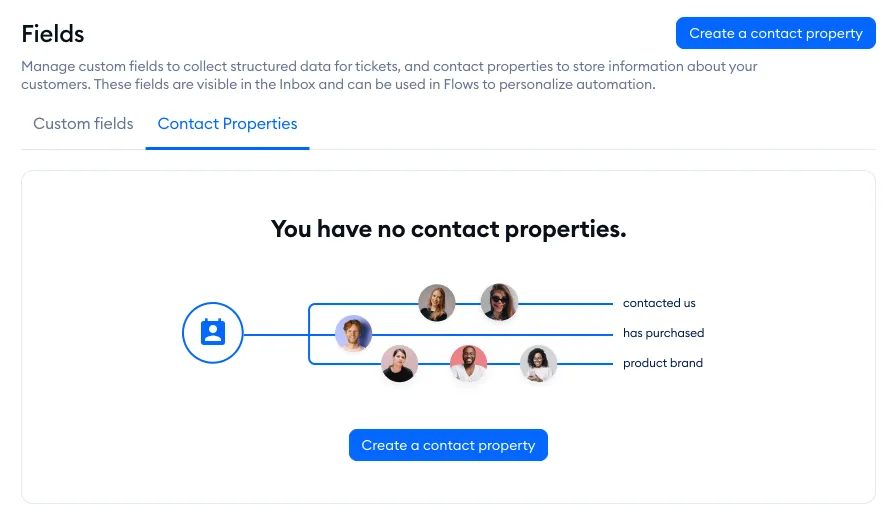
In there, open the Contact properties tab (next to Custom fields, which hold extra information on tickets) and you will see the option to create new Contact Properties:
Of course, if you already have some custom Contact Properties, you will see them listed:
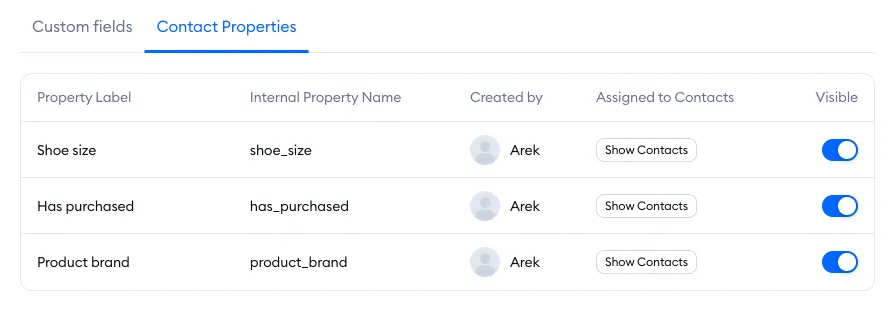
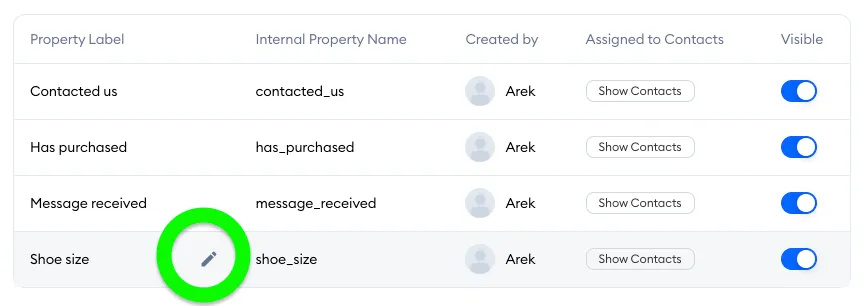
For each property, the list shows its Property Label and Internal Property Name, the agent who created it (Created by), and a Show Contacts button that lists every contact with a value for it. You can also choose to hide your Contact Properties if you wish, by switching off the Visible toggle, so they do not come up in certain lists later on (to avoid using a property that shouldn't be used anymore).
Click on the Create contact property button in the top-right to start creating a new one. In the Create a new contact property window, give the property a Property Label, e.g., 'Favorite color' or 'Shoe size,' depending on what you need. Tidio suggests an Internal Property Name based on the label - it's the name used in the CSV file with exported contacts:
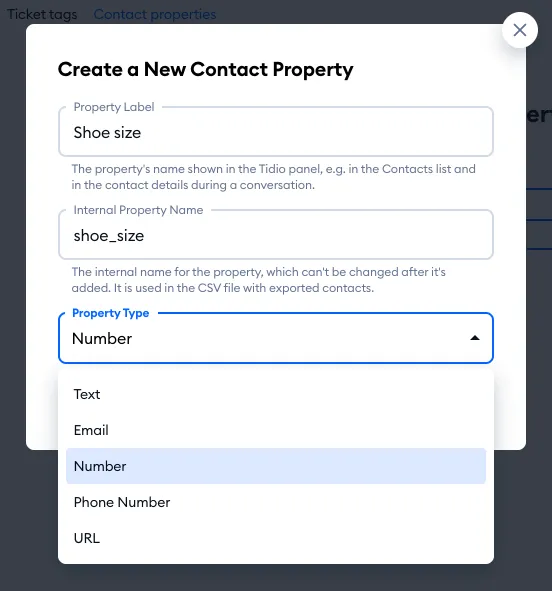
You also need to select the Property Type, which is crucial; this will determine what kind of data your new Contact Property can handle: Text, Email, Number, Phone Number or URL. When an agent types in a value, Tidio checks it against the type - a Number property, for example, accepts numbers with up to 2 decimals. Please note: you cannot modify the type or the internal name later on, so make sure you select the correct ones for your new property! Then, hit Create.
Please note: creating and editing Contact Properties needs the Fields permission (Manage Custom fields and Contact properties). If the Create contact property button is greyed out for you, ask your admin - see Permissions.
To edit an existing Contact Property's label, hover your mouse over the property and click the pencil icon. Only the label can be changed - the internal name and the type stay as they are. To show the contacts assigned to a specific property, click the Show Contacts button.
To learn more about managing your contacts, visit our complete guide about the Contacts list.
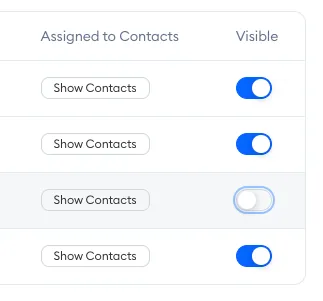
Please note: at the moment, existing Contact Properties cannot be deleted. They can be hidden with the Visible toggle; once hidden, the property stops being listed when you add a property to a customer in the Inbox. It will still remain listed when editing a flow, however (e.g. when using the Update contact property action).
Updating Contact Properties via Flows
Now that you know what Contact Properties are let's go over the scenarios and how they work in practice. Some default properties are already available in Tidio; if you'd like to use custom bits of information, you'll need to define your properties first.
In other words, if you want to store and track a contact's favorite color and age, you will need to define a 'color' property and an 'age' property.
Once set, you can export your contact list that contains an email address, favorite color, and age for each matching recipient.
Example
In this example, we'll be looking at an automatic customer-product grouping scenario. Our goal is to group our customers by clothing brand and provide availability info for the specific brand they select. To do so, we'll be using a custom property (that we created earlier in the Settings section) and contact segmentation.
In this example, the custom Contact Property will be mainly Product brand, which is a text type property - but we will also be using Shoe size, a number type property.
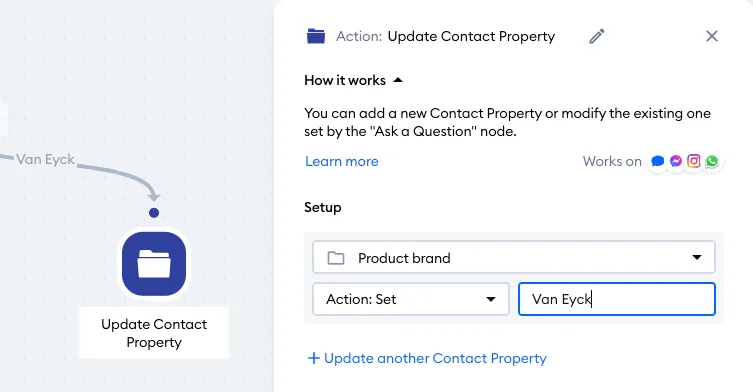
Create a Decision (Quick Replies) node to let the customer choose their brand and then use an Update contact property action with the brand as a value - select the Product brand property and set the value to be a brand name:
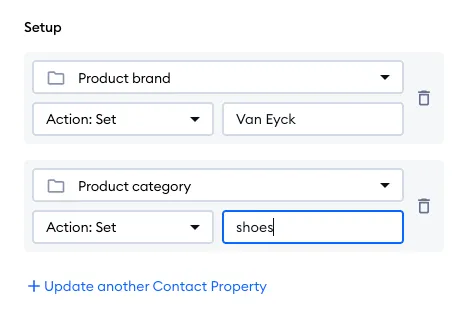
Please note: if you have multiple Contact Properties that you want to create (or update), you can do that in just a single action! Simply click the Update another contact property option (with the + icon) at the bottom, and specify the details as needed:
The entire flow allows the customer to select one of three brands in this example, and the general setup looks as follows:
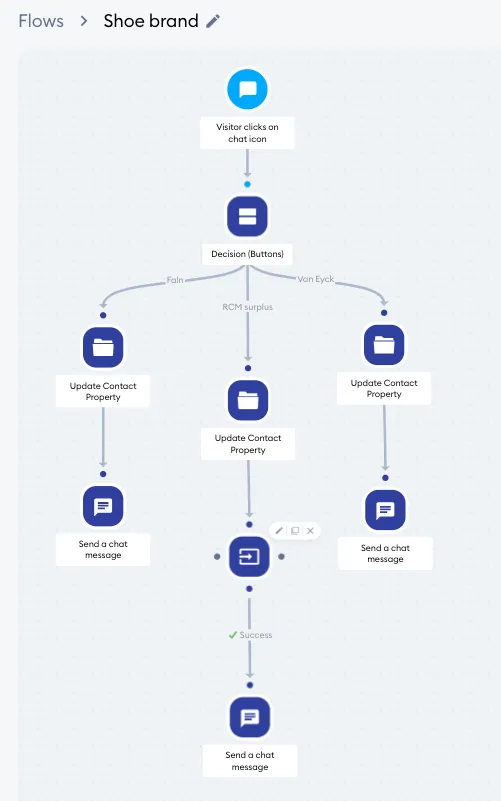
Whenever a specific brand is selected in the Decision (Quick Replies) action, the flow uses the Update contact property action to apply a specific property (or properties) to that customer, and apply a value to each property as well.
Here's what the example Decision (Quick Replies) step looks like in the editor:
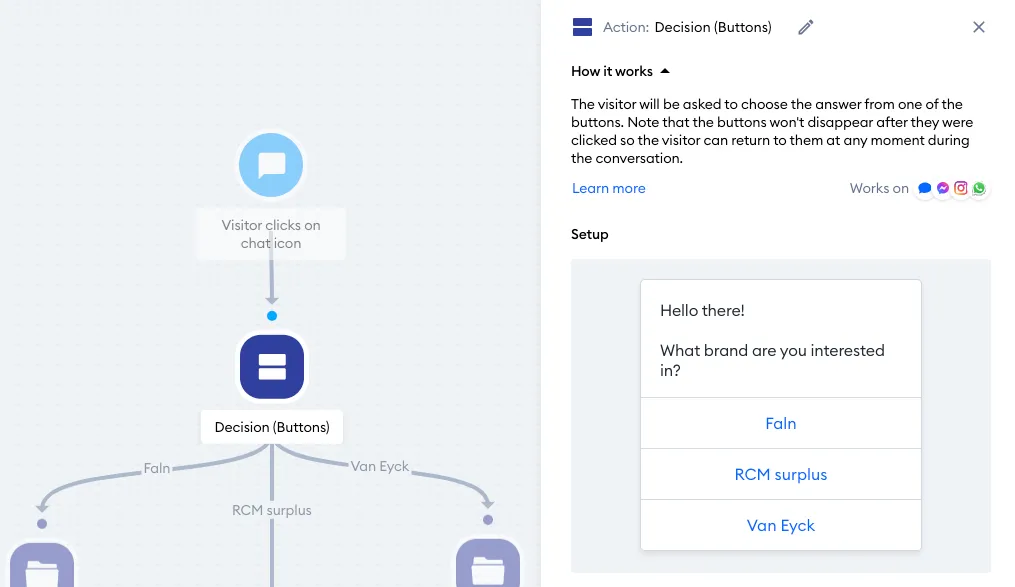
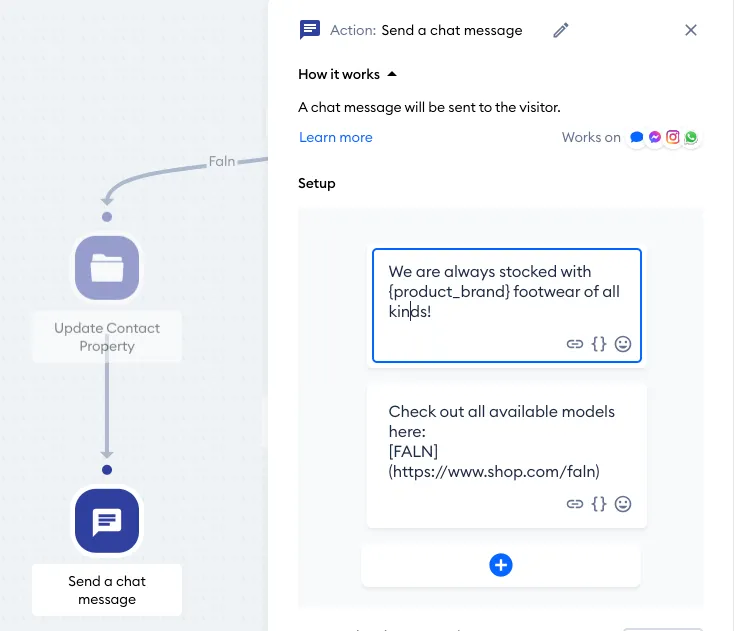
When the customer chooses one of the brands, the flow applies the appropriate Product brand value (the brand name) to that customer, and follows up with a message and link to the correct product page. Here, the actual Product brand property is used inside the message itself:
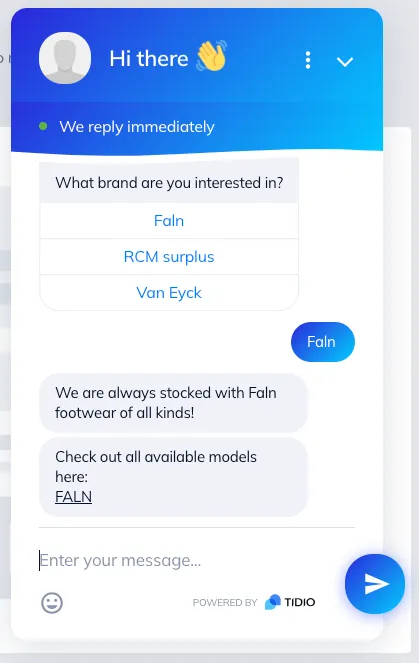
This way, the customer can see the selected brand name when they receive the message:
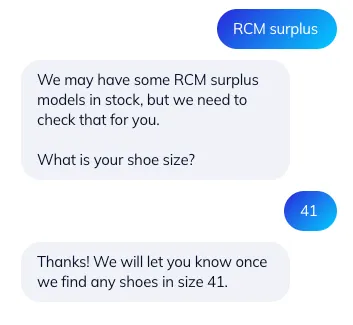
In another example in our flow, when the customer chooses a specific brand that may be out of stock, the flow informs about that specifically - and then goes on to ask the customer about their shoe size (so the store staff can check for availability later, and contact the customer via email):
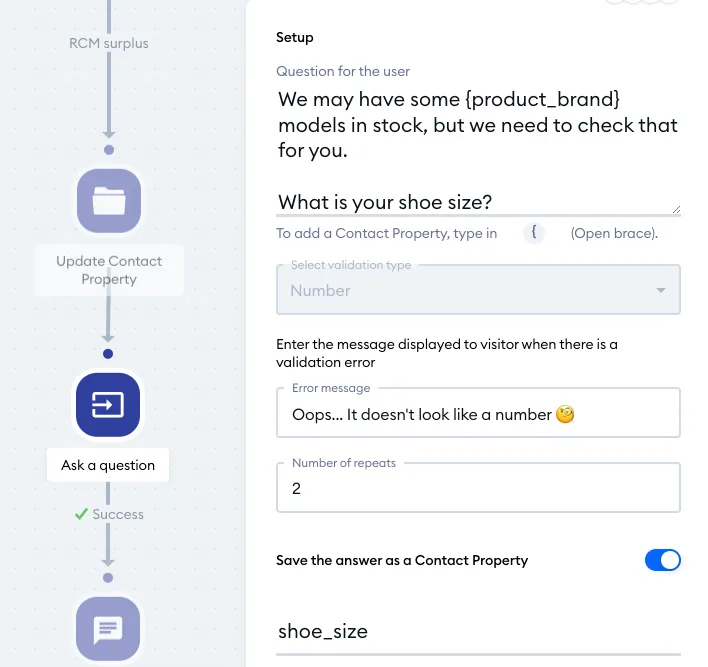
The flow uses the Ask a question action to ask for the shoe size. This simple action is a great way to collect single bits of information like that, but it needs to be set up properly to actually save the information in a usable way. Specifically, make sure that you enable the option called Save the answer as a contact property, available at the bottom of the action's settings:
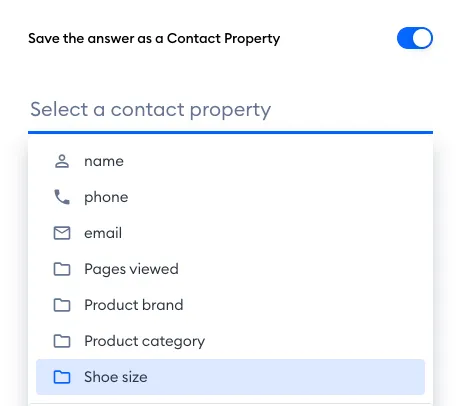
Select the correct Contact Property from the list that appears (Shoe size in this example), and the flow will be able to save the customer's answer properly. Of course, this will only work if the customer provides the answer correctly - the shoe size needs to be a number, after all (this is determined by the Contact Property type).
Notice how you can use any existing Contact Property inside your flow messages; simply click on the braces icon ({ }) to insert a property, or start typing inside an open brace:
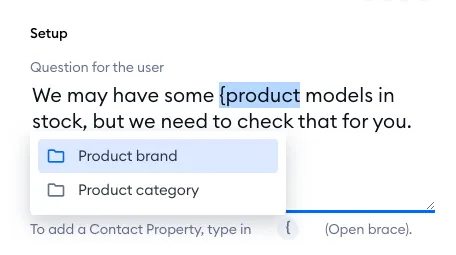
In the flow editor, you will always see properties inserted this way in your flow messages, and you can modify them anytime, of course. Using properties in messages can be useful when you are sending a message that needs to use different bits of information, based on what the customer had provided earlier.
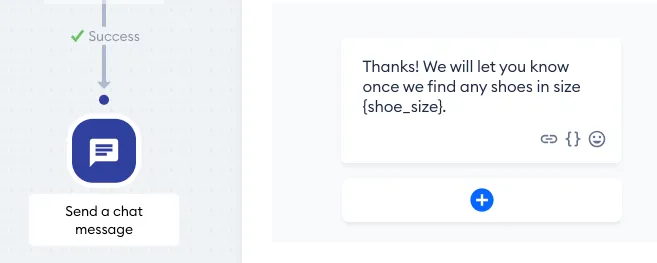
From the customer's perspective, the message will simply include the appropriate information - as long as it was available in your Tidio project for that customer:
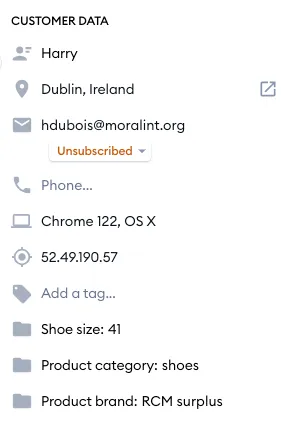
Whenever you're chatting with a customer, you will see all of the Contact Properties that have any value assigned in their specific case, e.g. a shoe size they provided, or the product brand they selected:
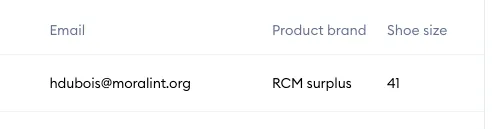
The same information is available when you browse your Customers list, in columns:
Adding Contact Properties manually
If you want to add a contact property to your contact during a conversation or a ticket - you can do that in the Customer data section of the customer profile, on the right. This may be helpful when you're trying to save important data about the visitor that you may use in the future. Click the + icon (Add contact property) in the section's header:
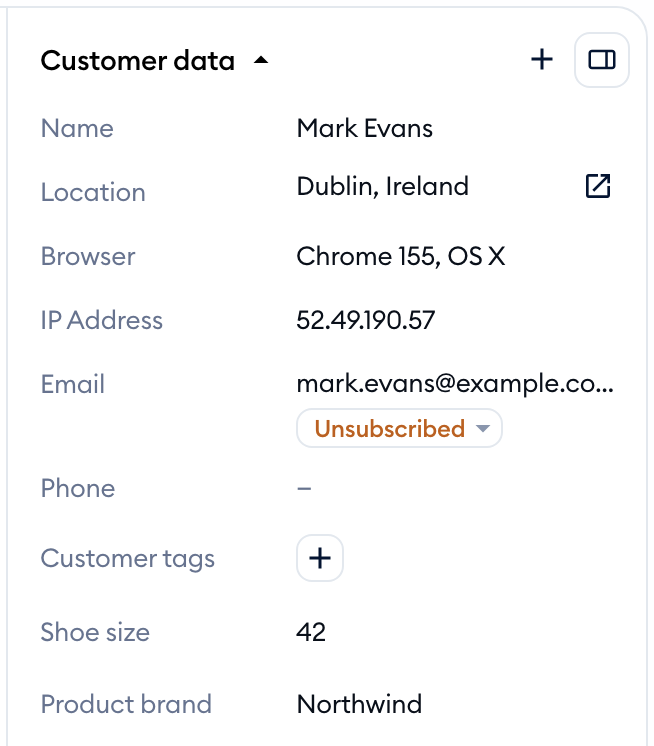
You can choose the contact property from the list of available properties (type in the search box to find it), or create a completely new contact property with Create a new contact property at the bottom of the list. Hidden properties, and the ones the customer already has, aren't listed:
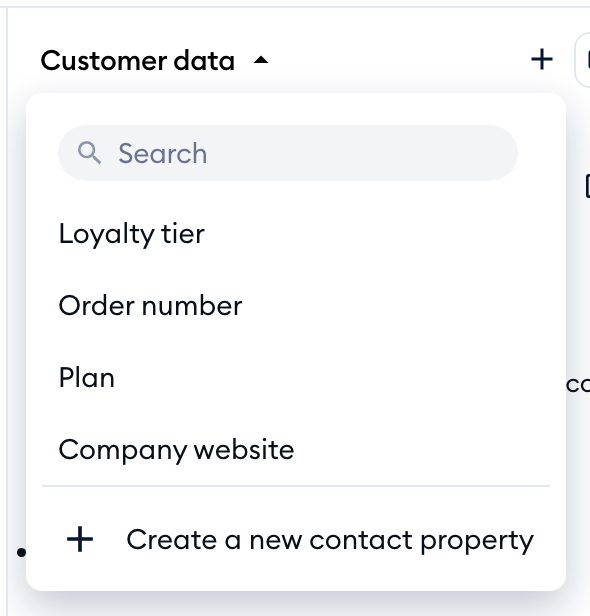
Type in the value and press Enter (or click anywhere outside the field) to save it. Tidio checks the value against the property's type - if it doesn't match, you'll see a message like Email is invalid! or Number is invalid! under the field. To remove a value, hover over it and click the X on the right. When a customer has more than three properties, click Show all to see the rest.
Using Contact Properties with Lyro
Lyro (the AI agent) can use your Contact Properties to personalize its replies. By default, Lyro can access the visitor's name, email address and current URL. To let it read your own properties as well, head over to Lyro AI Agent > Configure, open the General tab, and pick the properties in the Contact properties field of the Access permissions section - or choose All custom:
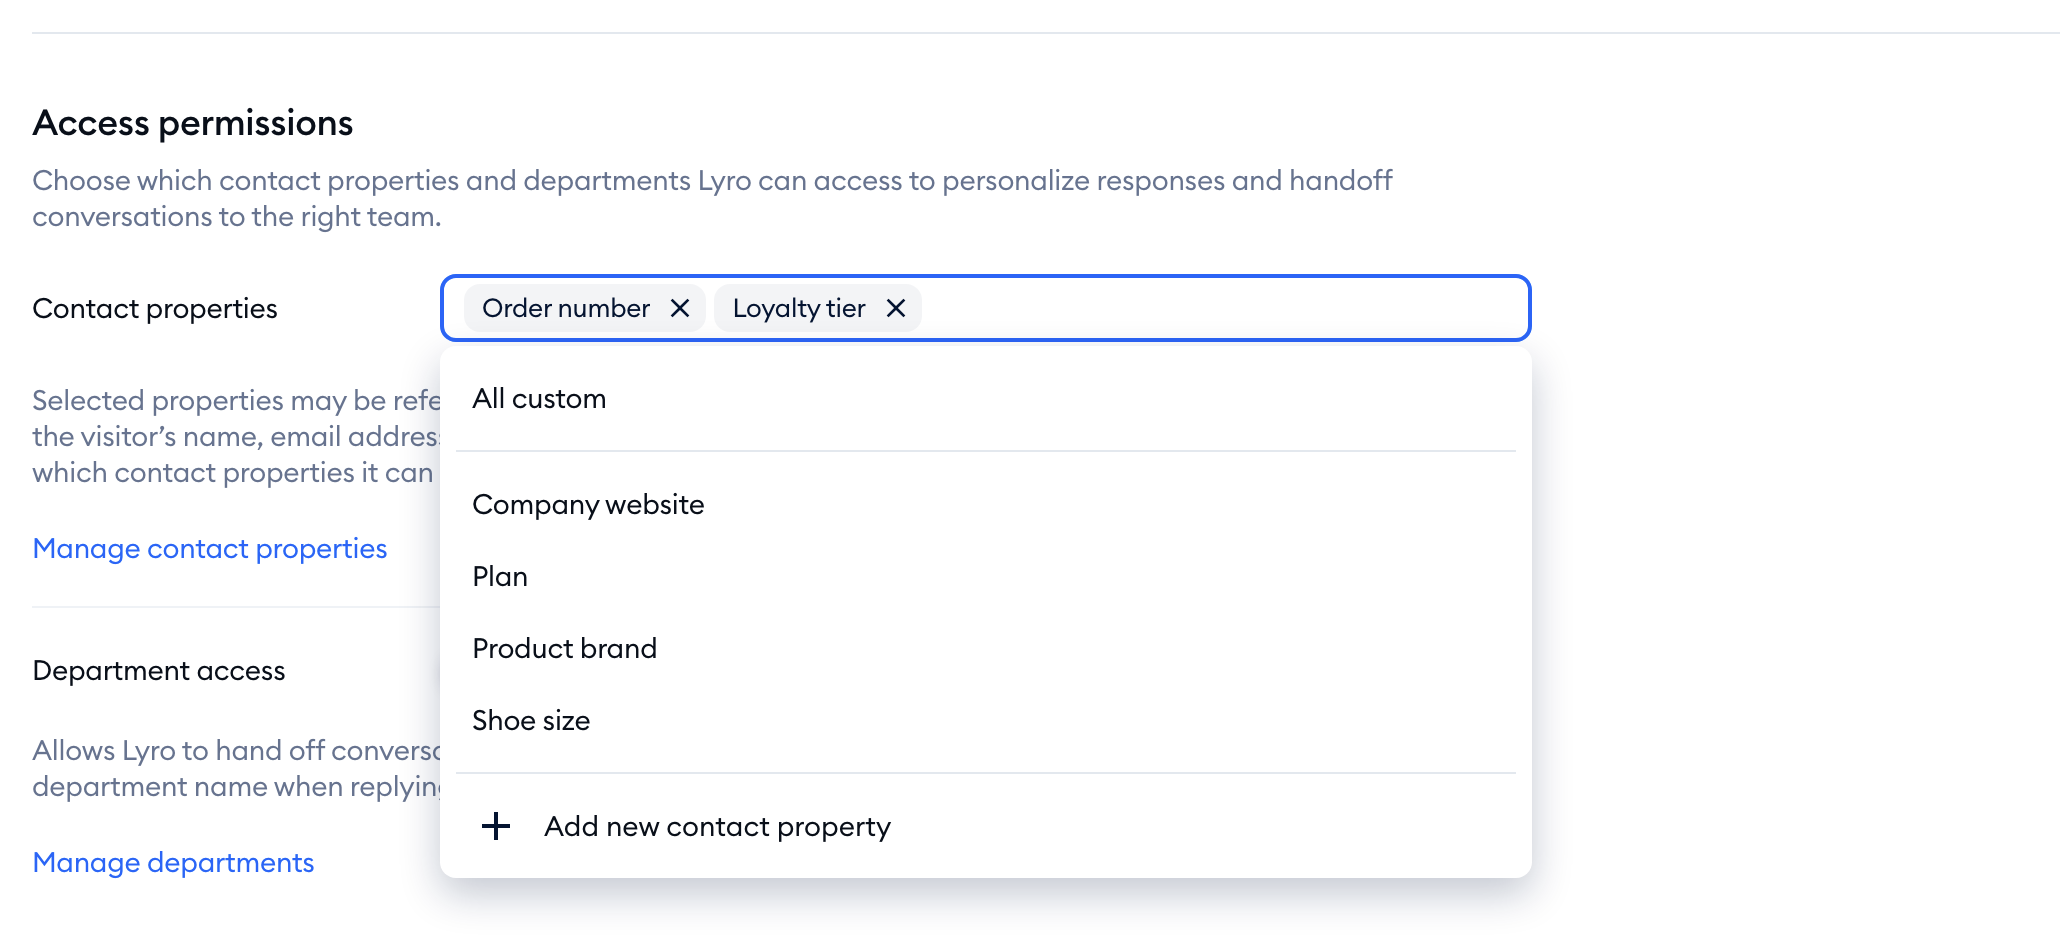
Selected properties may be referenced in Lyro's replies to customers, so share only what's necessary. You can also reference them in Lyro Guidance, and in Lyro Procedures you can add a Read Contact property or Update Contact property step, so Lyro looks up a value or saves what the customer tells it (e.g. their order number).
Please note: the Access permissions selection controls which properties Lyro can reference, not which ones it can update in a Procedure.
How to use Lead Scoring in Tidio
Lead scoring is the process of assigning values to each lead you generate for the business, often in the form of numerical points. You can score your leads based on multiple attributes, including the information they've submitted to you and how they've engaged with your website. This process helps prioritize leads, respond to them appropriately, and increase the rate at which those leads become customers.
You can award points for a variety of actions. Points can be assigned once, awarded, and/or subtracted after each completed activity.
Please note that you need to register the email address first for the contact to appear on the contacts list. To ask for the email, use the Pre-Chat Survey or a Lead Generation flow; most lead-scoring scenarios are based on returning visitors. As soon as you register their email address - you will see it assigned to a Contact Property.
Example
Number of Page Views
In this example, we'll create a new Contact Property and automation for lead scoring.
If you'd like to create lead scoring for a specific contact, the number of pages viewed can be your best indication of a person's interest in a particular product. This property keeps a running counter of the number of times the person has viewed one of your web pages. The higher the number, the more engaged they are; you can note the right moment to contact such highly interested users.
First, create a new Contact Property and set number as its type:
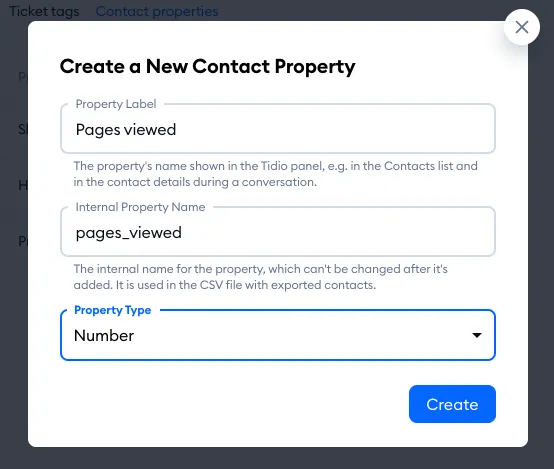
Once the property is ready, create a new flow from scratch. Use Visitor opens a specific page as the trigger. Use the option unlimited (send on each visit) to let it work whenever someone visits that particular page.
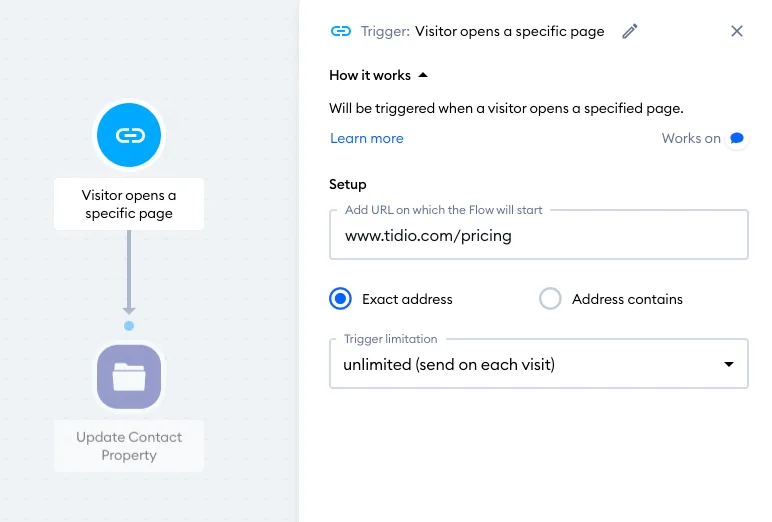
Drop the action node Update contact property into the workspace & choose the Contact Property created earlier. Set the contact property to Increase (+) by a value of 1.
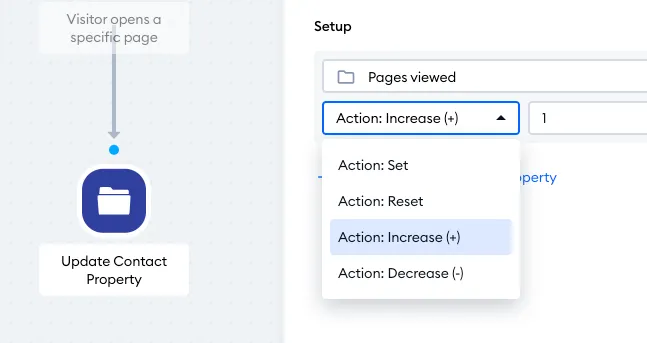
This property will now keep a running tally of the number of times the person has viewed a specific page. To check matching contacts, visit the Contacts section.
Merging multiple Contact Property values into one new value
When you're collecting several different pieces of information from a customer (e.g. their first name, address, number, company name, etc.), it is possible to copy those multiple separate values into a brand new Contact Property - as just one custom value. This way, you can mix different types of data, like text and numbers, and store them in one handy Contact Property if you like.
In the example below, the Send a form action asks the visitor for their full name and team size. Asking for these two separate pieces of information is practical and efficient from the customer's perspective, and does not allow much room for error - the two values remain separate, as the Contact Properties 'Name' and 'Team size'.
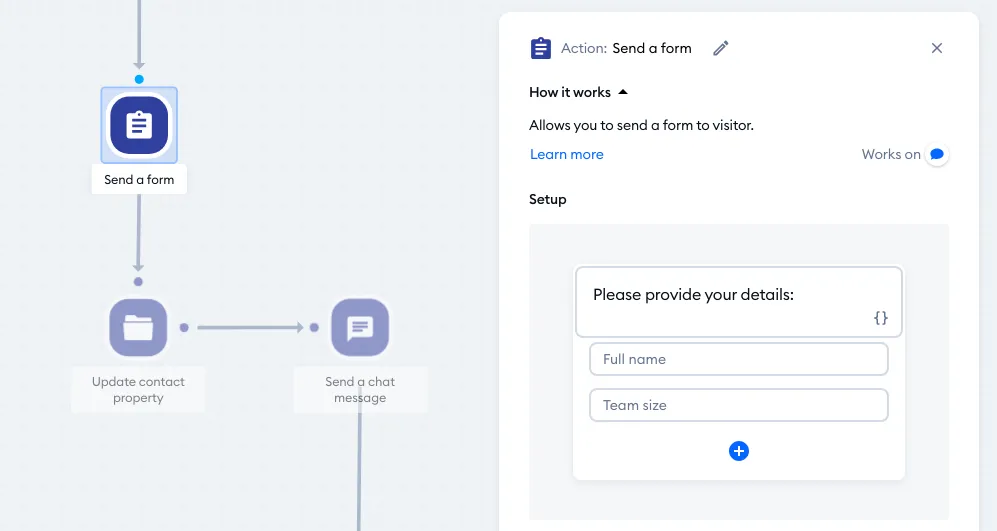
The Send a form action is configured properly to save the provided information, each in their own Contact Property:
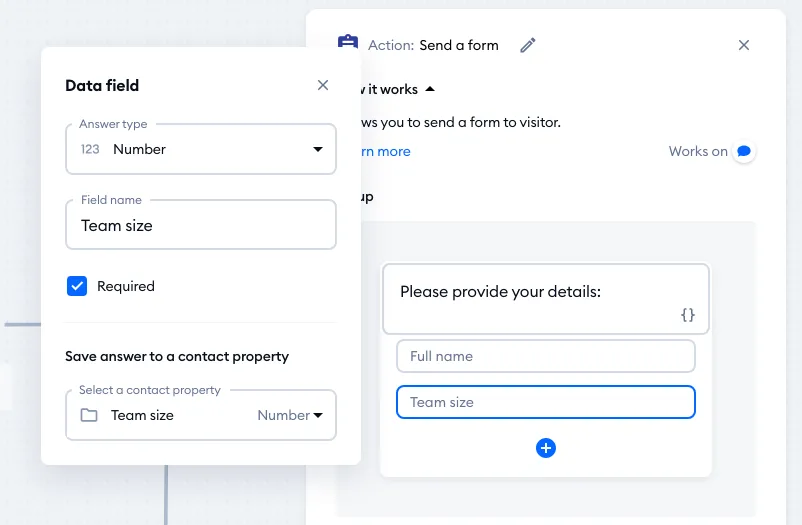
However, for the purposes of quick technical support, the project owner prefers to store all this information in just one Contact Property called 'Info' - where both the customer's name and team size are saved as a single value.
This new "mixed" value can be created inside the Update contact property action, which allows you to format it in a way that makes most sense as well:
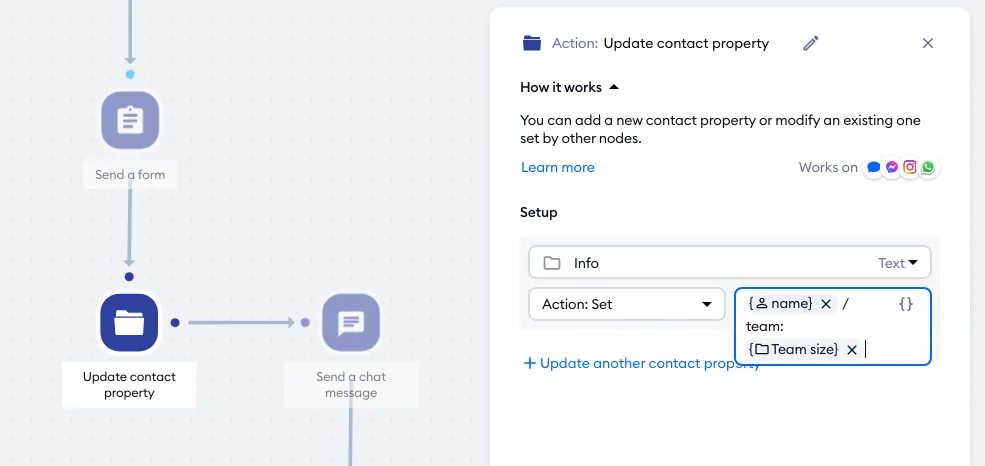
In the example above, the new Contact Property is called 'Info', and the value uses the visitor's two other Contact Properties: 'Name' and 'Team size'. The new value is also formatted for clarity.
Also in this example, the flow asks the customer to confirm if the info is correct - by displaying the newly crated Contact Property for them on chat:
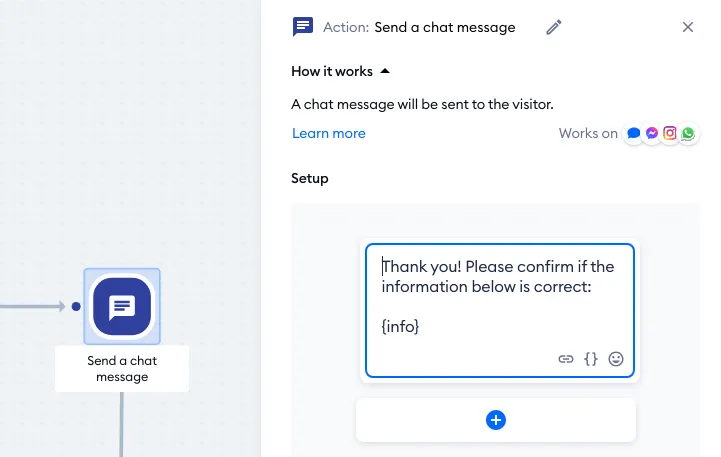
In practice, the customer first fills out the form:
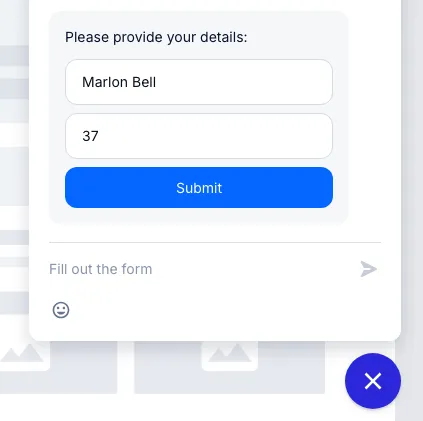
... and then sees the new value that resulted from their input:
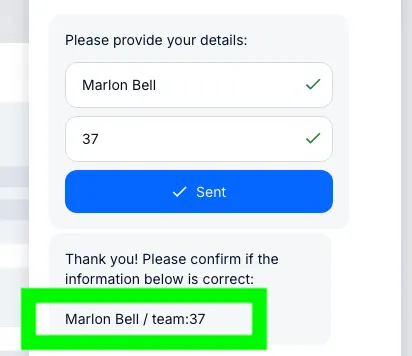
The agents can see the same info as the new 'Info' property when chatting with the customer, instead of two separate properties:
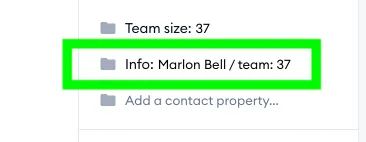
Naturally, the same information can be displayed in (and exported from) the Contacts list:

