Add the Tidio chat widget to your Lovable site with one prompt, or edit the code yourself. New Lovable projects use TanStack Start and older ones use React with Vite. The script goes in a different file in each, and the prompt below covers both.
In this article, you'll learn:
- How to find your Public key
- How to ask Lovable to add the widget
- How to add the script yourself
- How to give Lovable the Tidio documentation
- How to check the installation
- How to troubleshoot the installation
Find your Public key
Log in to your Tidio panel and go to Settings > Developer > Project data. Click the Public key field to select its value, then copy it.
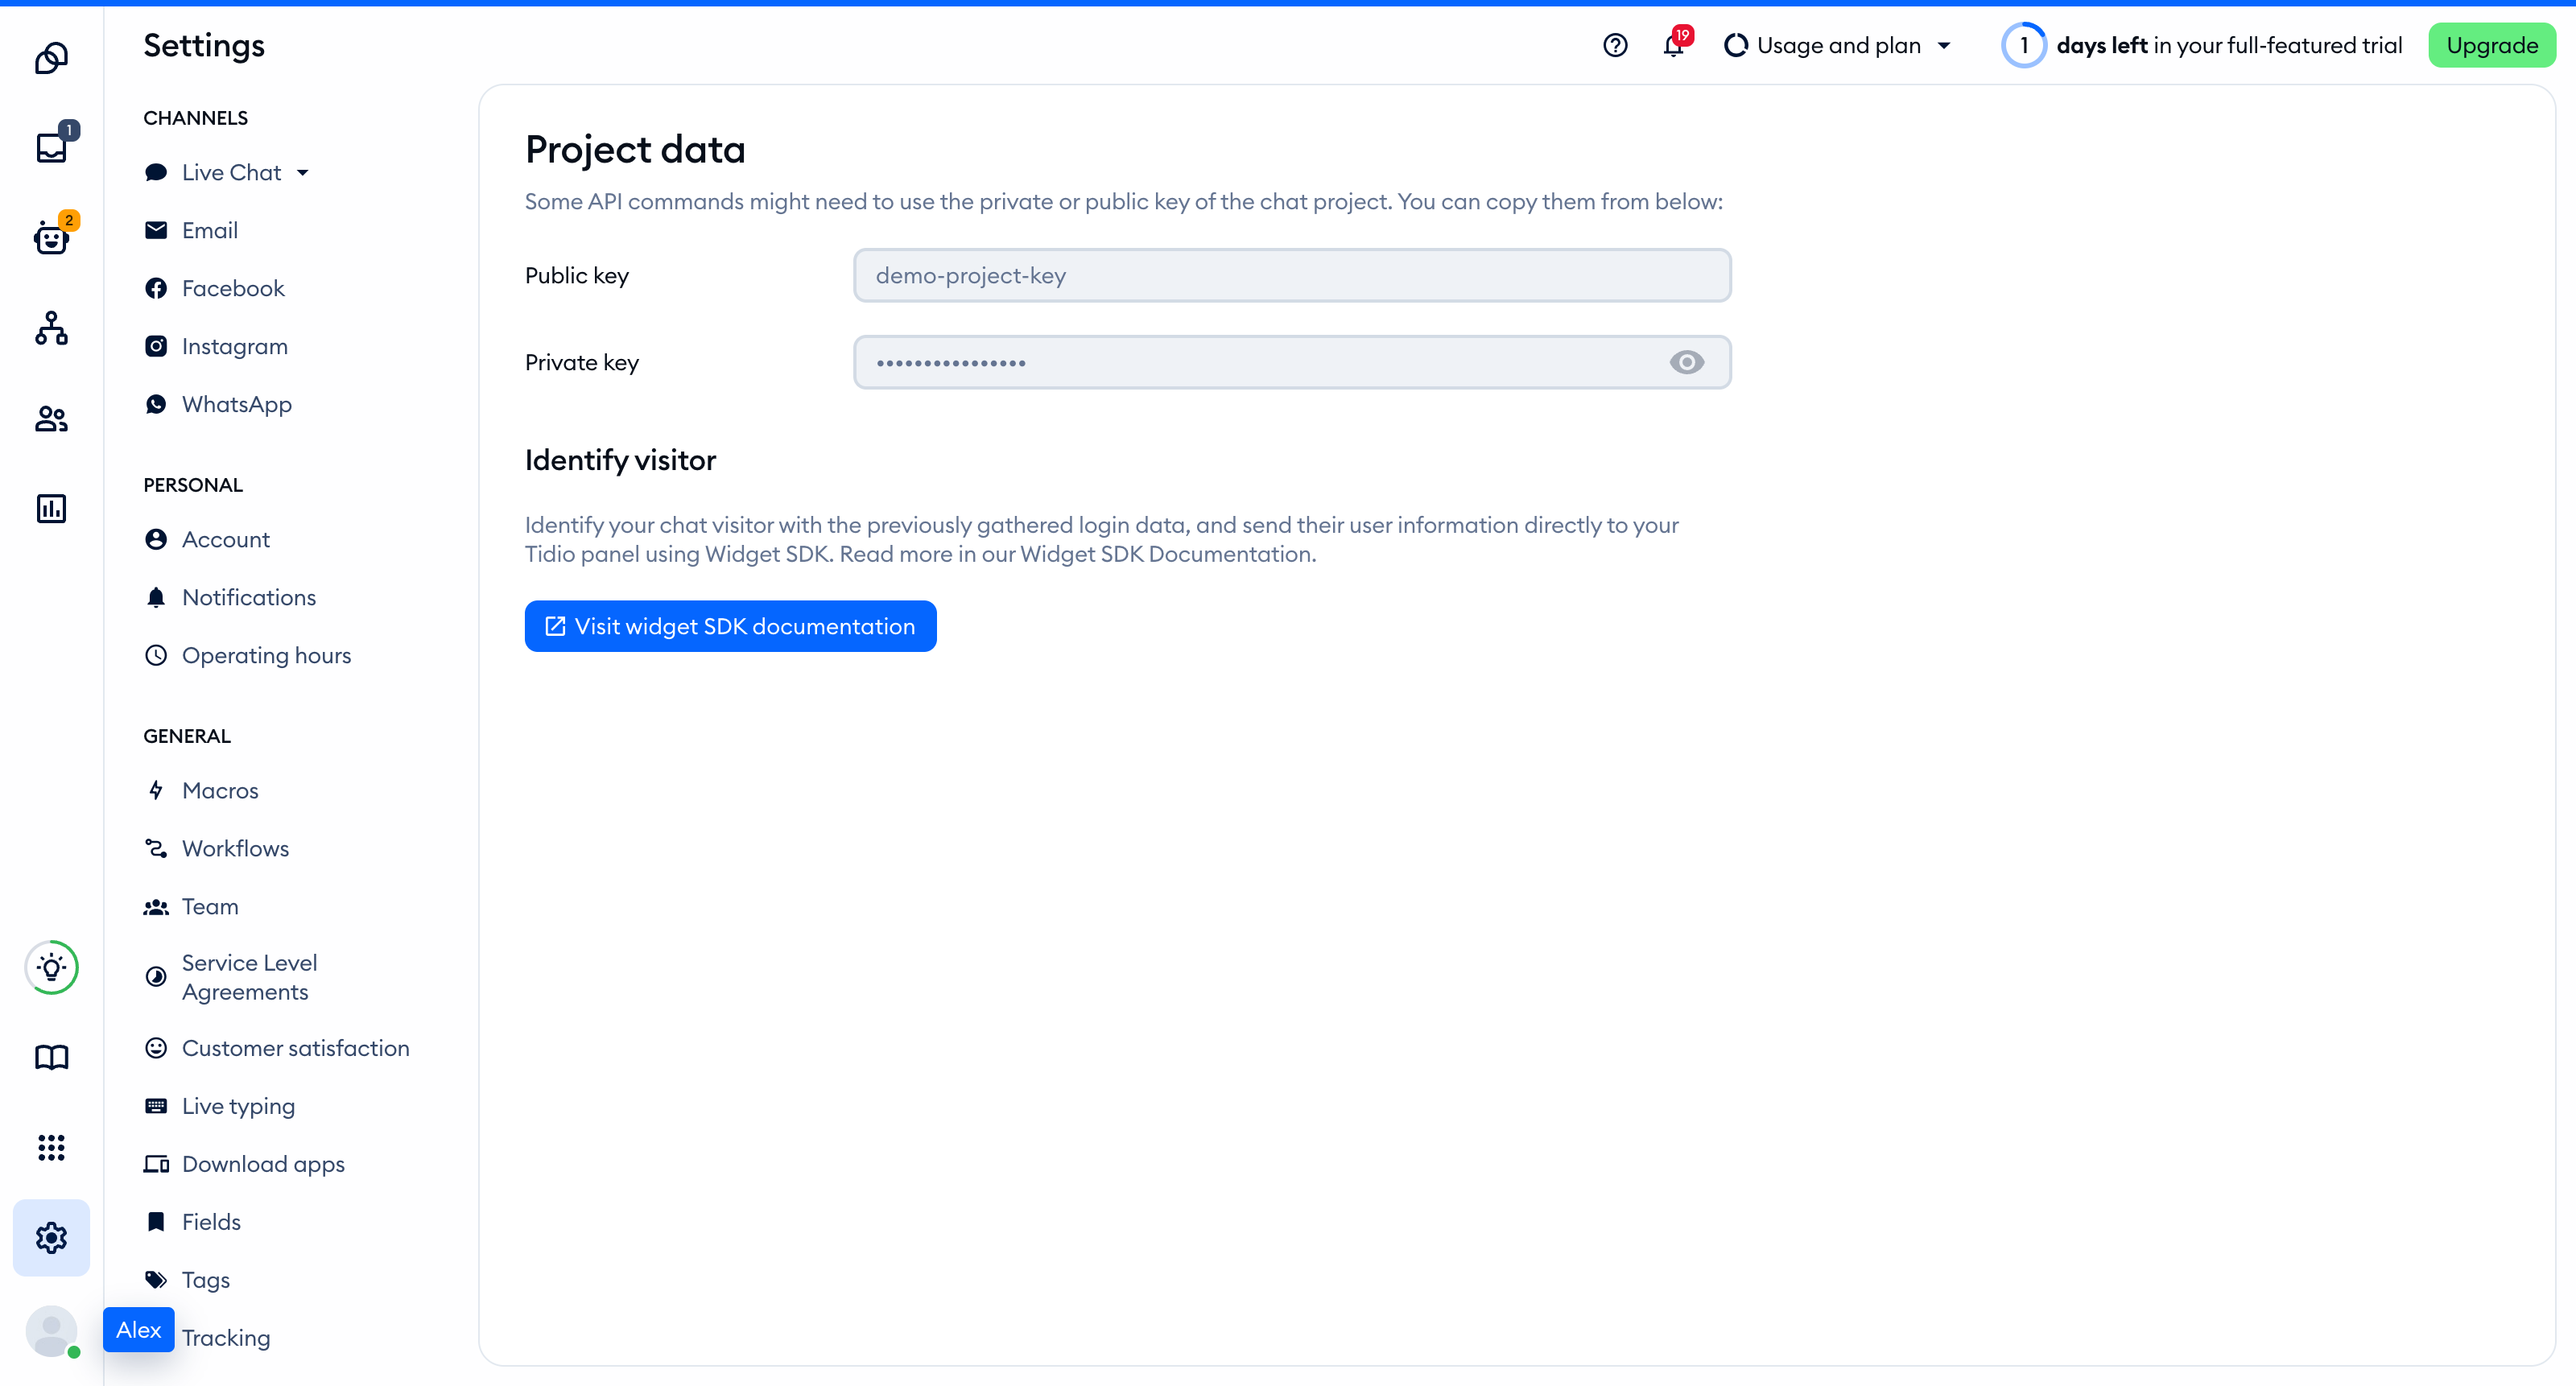
The Public key is part of the script address that every visitor's browser loads, so you can keep it in front-end code. The private key on the same page is different: never put it in your website.
You'll find the same key inside the installation code in Settings > Live Chat > Installation, under Manual install:
<script src="//code.tidio.co/YOUR_PUBLIC_KEY.js" async></script>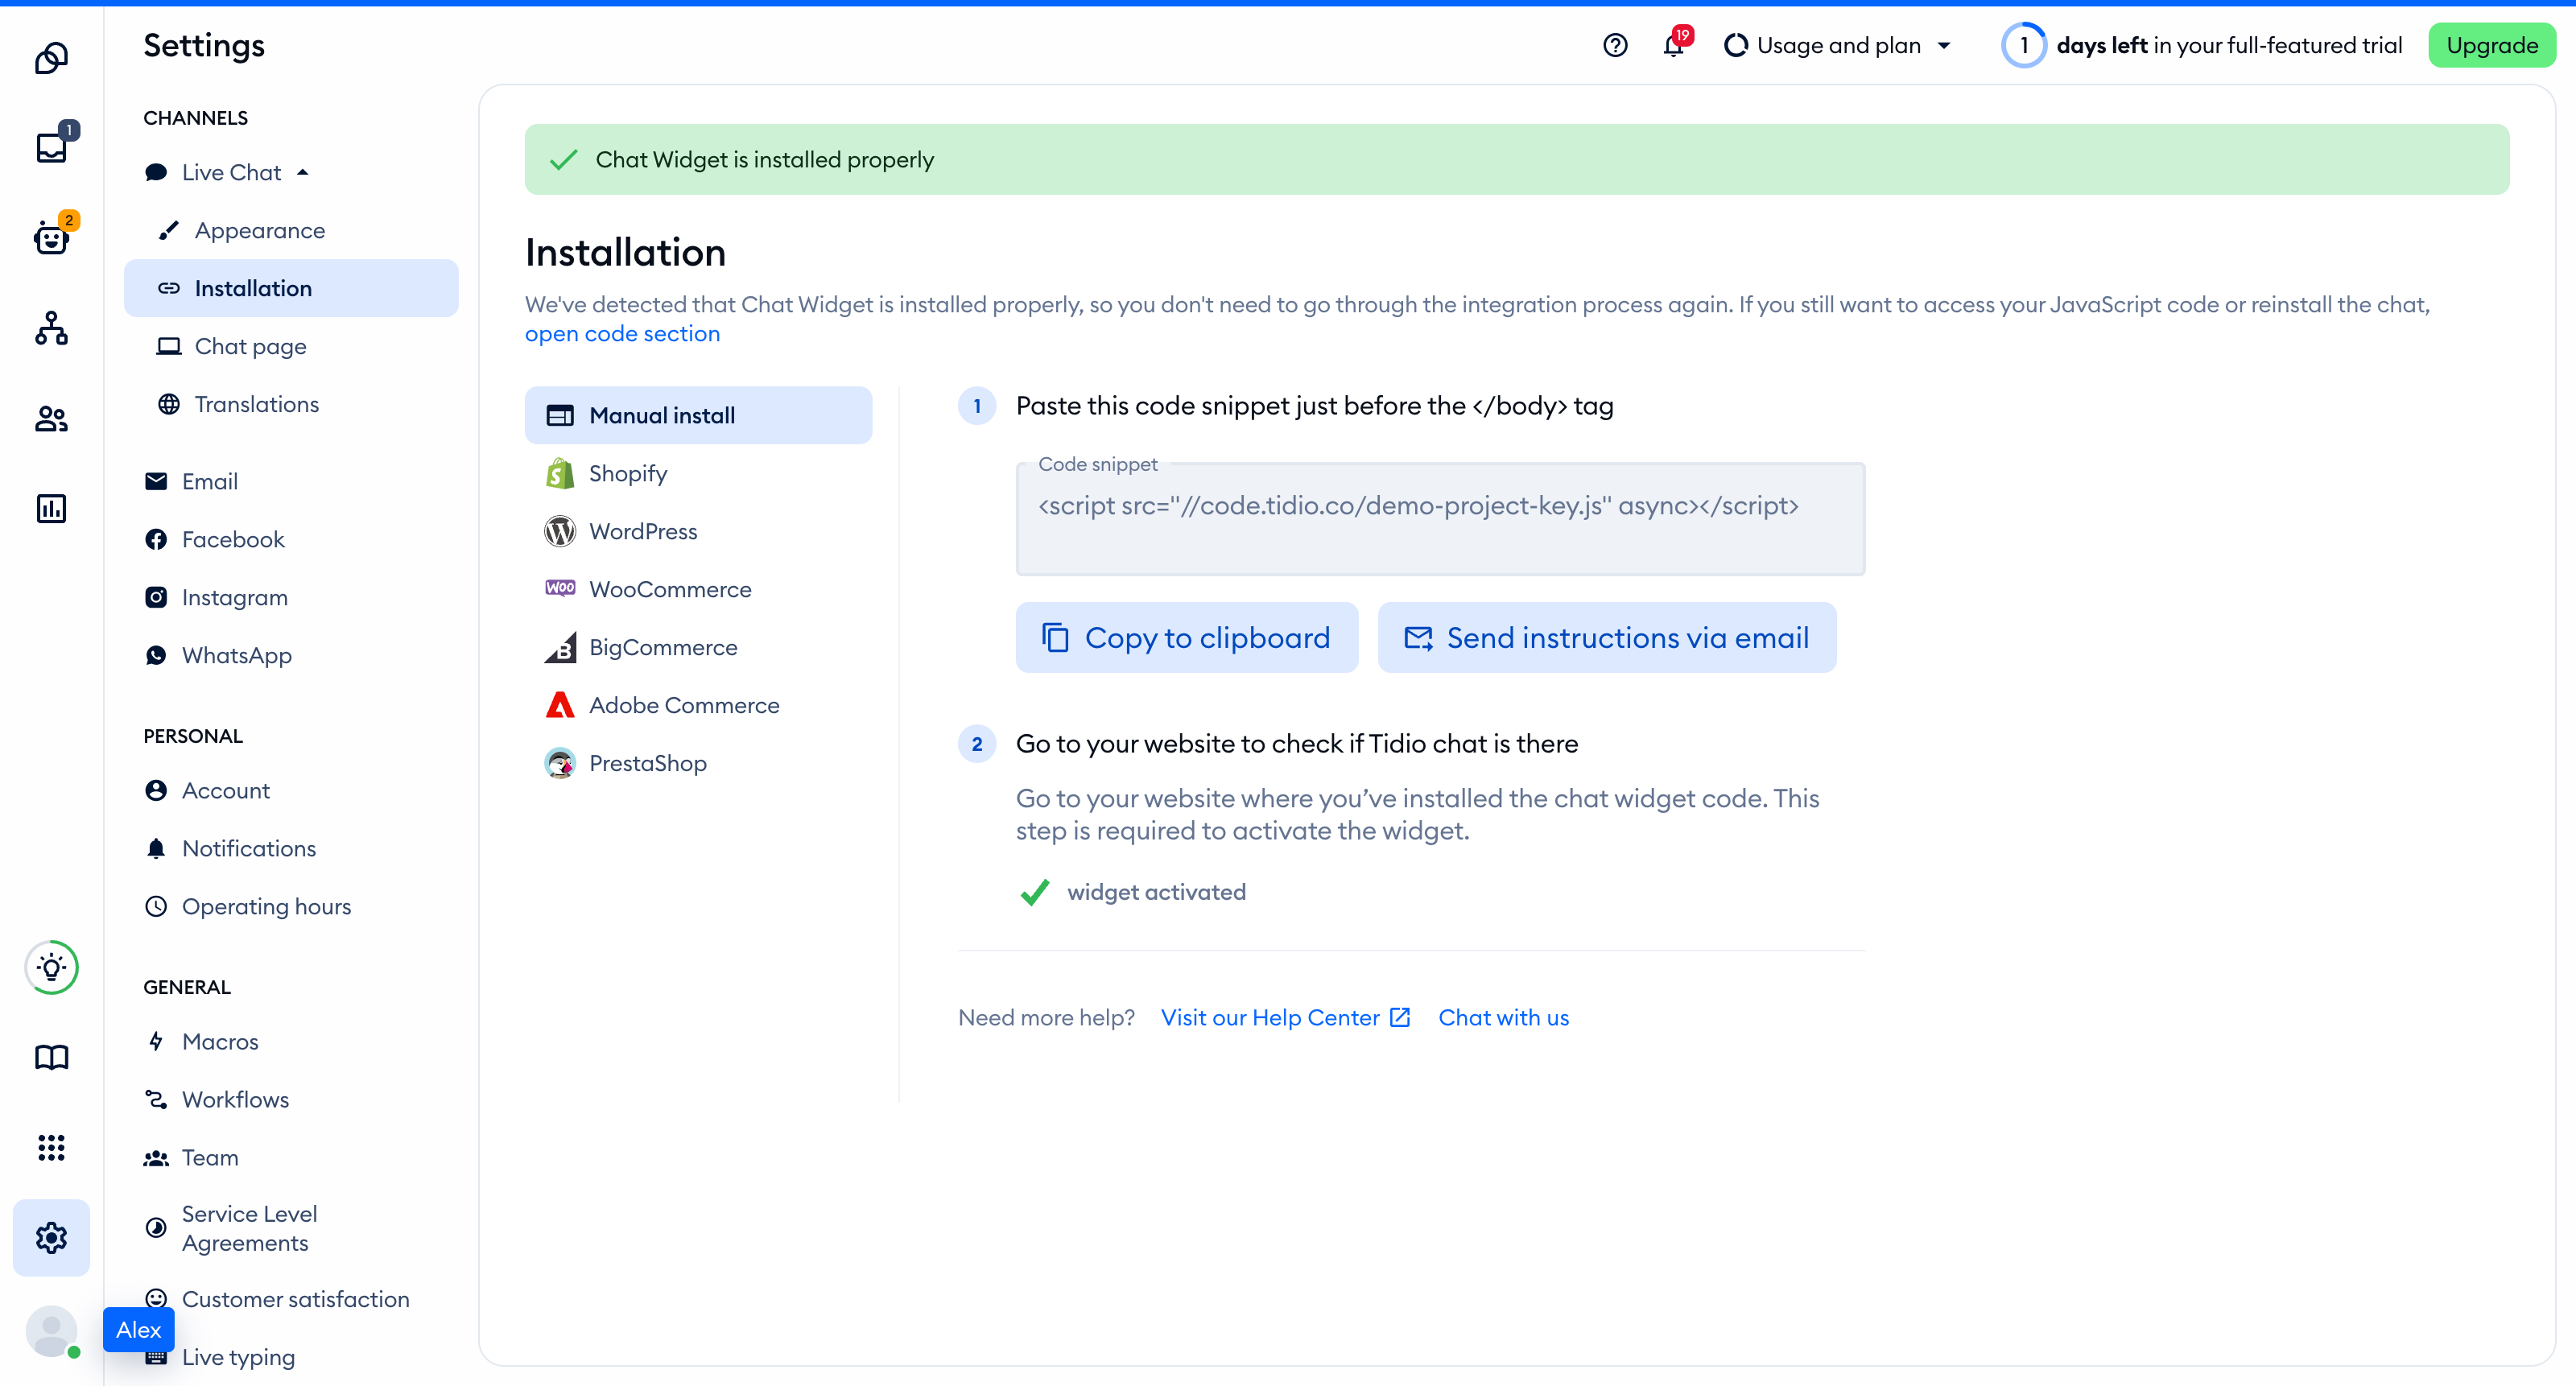
Ask Lovable to add the widget
Replace YOUR_PUBLIC_KEY in this prompt with your Public key, then send it in your project's chat. Lovable changes code in Build mode, which is active unless you switched to Chat mode or Plan mode.
Add the Tidio live chat widget to this project.

1. Load this script once on every page, at the end of the body, with async:
   <script src="//code.tidio.co/YOUR_PUBLIC_KEY.js" async></script>
2. Put it in the root route file for a TanStack Start project, or index.html in the project root for an older React + Vite project, so it loads once and stays loaded during client-side navigation. Do not add it to single pages or to a component that mounts more than once.
3. Do not install an npm package for Tidio. The script tag is the whole installation.
4. Do not use window.tidioChatApi on the server. Use it only in the browser, after the "tidioChat-ready" event fires on document.
5. Change nothing else, then tell me which file you edited.

Reference: https://help.tidio.com/articles/install-ai-coding-agents/
Use the TanStack Start installation guide for Lovable's current default stack, or the React installation guide for older React with Vite projects. If you do not know your project's stack, ask Lovable: What stack is this project on?
When the change is ready, click Publish in the top right of the editor. For a new site, review the proposed address and click Publish again. For an existing live site, click Publish changes. Test the published URL, not just the preview.
Add the script yourself
Open Lovable's Code tab to browse the project files. You need edit access to the project to open the code editor, and a paid plan to edit and save files. On the Free plan the editor is read-only, so use the prompt above instead.
For an older React with Vite project that has index.html in the project root:
- Open Code and select
index.html. - Find the closing
</body>tag. Add this script immediately before it, replacingYOUR_PUBLIC_KEYwith your Public key. Keep the existing page content and scripts.
<script src="https://code.tidio.co/YOUR_PUBLIC_KEY.js" async></script>Click Save, then publish the change. Do not add this tag if the prompt already installed it.
For more detail on older projects, follow Install Tidio on React. For a TanStack Start project, follow Install Tidio on TanStack Start to edit the root route instead. Do not create an index.html file for that approach.
Give Lovable the Tidio documentation
Add project instructions
Open Project settings > Instructions and add these two lines to Project instructions. Lovable includes project instructions as context when you send messages:
Keep the Tidio widget script loaded once in the root HTML document or root layout, never in individual pages or repeatedly mounted components. Do not add an npm package for Tidio.
Before changing the Tidio integration, consult https://help.tidio.com/llms.txt and https://developers.tidio.com/llms.txt for the help center and Widget SDK documentation.
Connect the documentation through MCP
Lovable connects to remote MCP servers as chat connectors on all plans, unless your workspace admin has disabled them. The connector gives Lovable the documentation while it builds. It does not install the widget in your published app.
- Open Connectors, select Add custom, then choose MCP server.
- Enter
Tidio documentationas the Server name. - If a Connection dropdown appears, keep Direct connection.
- Enter
https://help.tidio.com/mcpas the Server URL. - Choose No authentication, then click Add server.
The Tidio documentation server is read-only and needs no login. Ask Lovable to use the Tidio documentation connector to find the installation guide for your project's framework before editing the integration.
See Lovable's custom MCP documentation if the connector option is unavailable.
Check the installation
Open your site in a regular browser window. The chat widget appears in the corner of the page and stays there when you move between pages. Headless and automated browsers may not show the widget, so do not rely on them for this check.
Loading a page with the widget is what activates it. After that, Settings > Live Chat > Installation in your Tidio panel says Chat Widget is installed properly.
Troubleshoot the installation
- If the published site has not changed, click Publish, then Publish changes. Saving code does not update the live site.
- If the widget does not load, check that you replaced
YOUR_PUBLIC_KEYwith the Public key, not the private key. - If you see two widgets or duplicate script requests, ask Lovable to find every reference to
code.tidio.coand keep one installation in the root document or layout. - If a TanStack Start page fails during server rendering, check that code using
windowordocumentruns only in the browser. - If your site uses a Content Security Policy, allow Tidio's hosts. The
script-srcdirective needscode.tidio.co. The Content Security Policy page of the developer documentation has the full list. - If an automated check cannot see the widget, check the published site in a regular browser window.