# Install Tidio on Gatsby
Section: Install Tidio
Description: Add Tidio to Gatsby, identify logged-in visitors, and hide the chat widget on checkout pages during client-side navigation.
Verified against Tidio panel 12.331.0
Last updated: 2026-11-18
Source: https://help.tidio.com/articles/install-gatsby/
Add Tidio to your Gatsby site with one script in its server-rendered HTML. You do not need a package for Tidio. Checked with Gatsby 5.16.1 and React 19.3.1.
**In this article, you'll learn:**
- [How to find your Public key](https://help.tidio.com/articles/install-gatsby/#public-key)
- [How to add the widget to Gatsby](https://help.tidio.com/articles/install-gatsby/#install)
- [How to check the installation](https://help.tidio.com/articles/install-gatsby/#check)
- [How to identify logged-in visitors](https://help.tidio.com/articles/install-gatsby/#identify-visitors)
- [How to hide the widget on some pages](https://help.tidio.com/articles/install-gatsby/#hide-on-pages)
- [How to troubleshoot the installation](https://help.tidio.com/articles/install-gatsby/#troubleshooting)
## Find your Public key
Log in to your Tidio panel and go to **Settings > Developer > Project data**. Click the **Public key** field to select its value, then copy it.
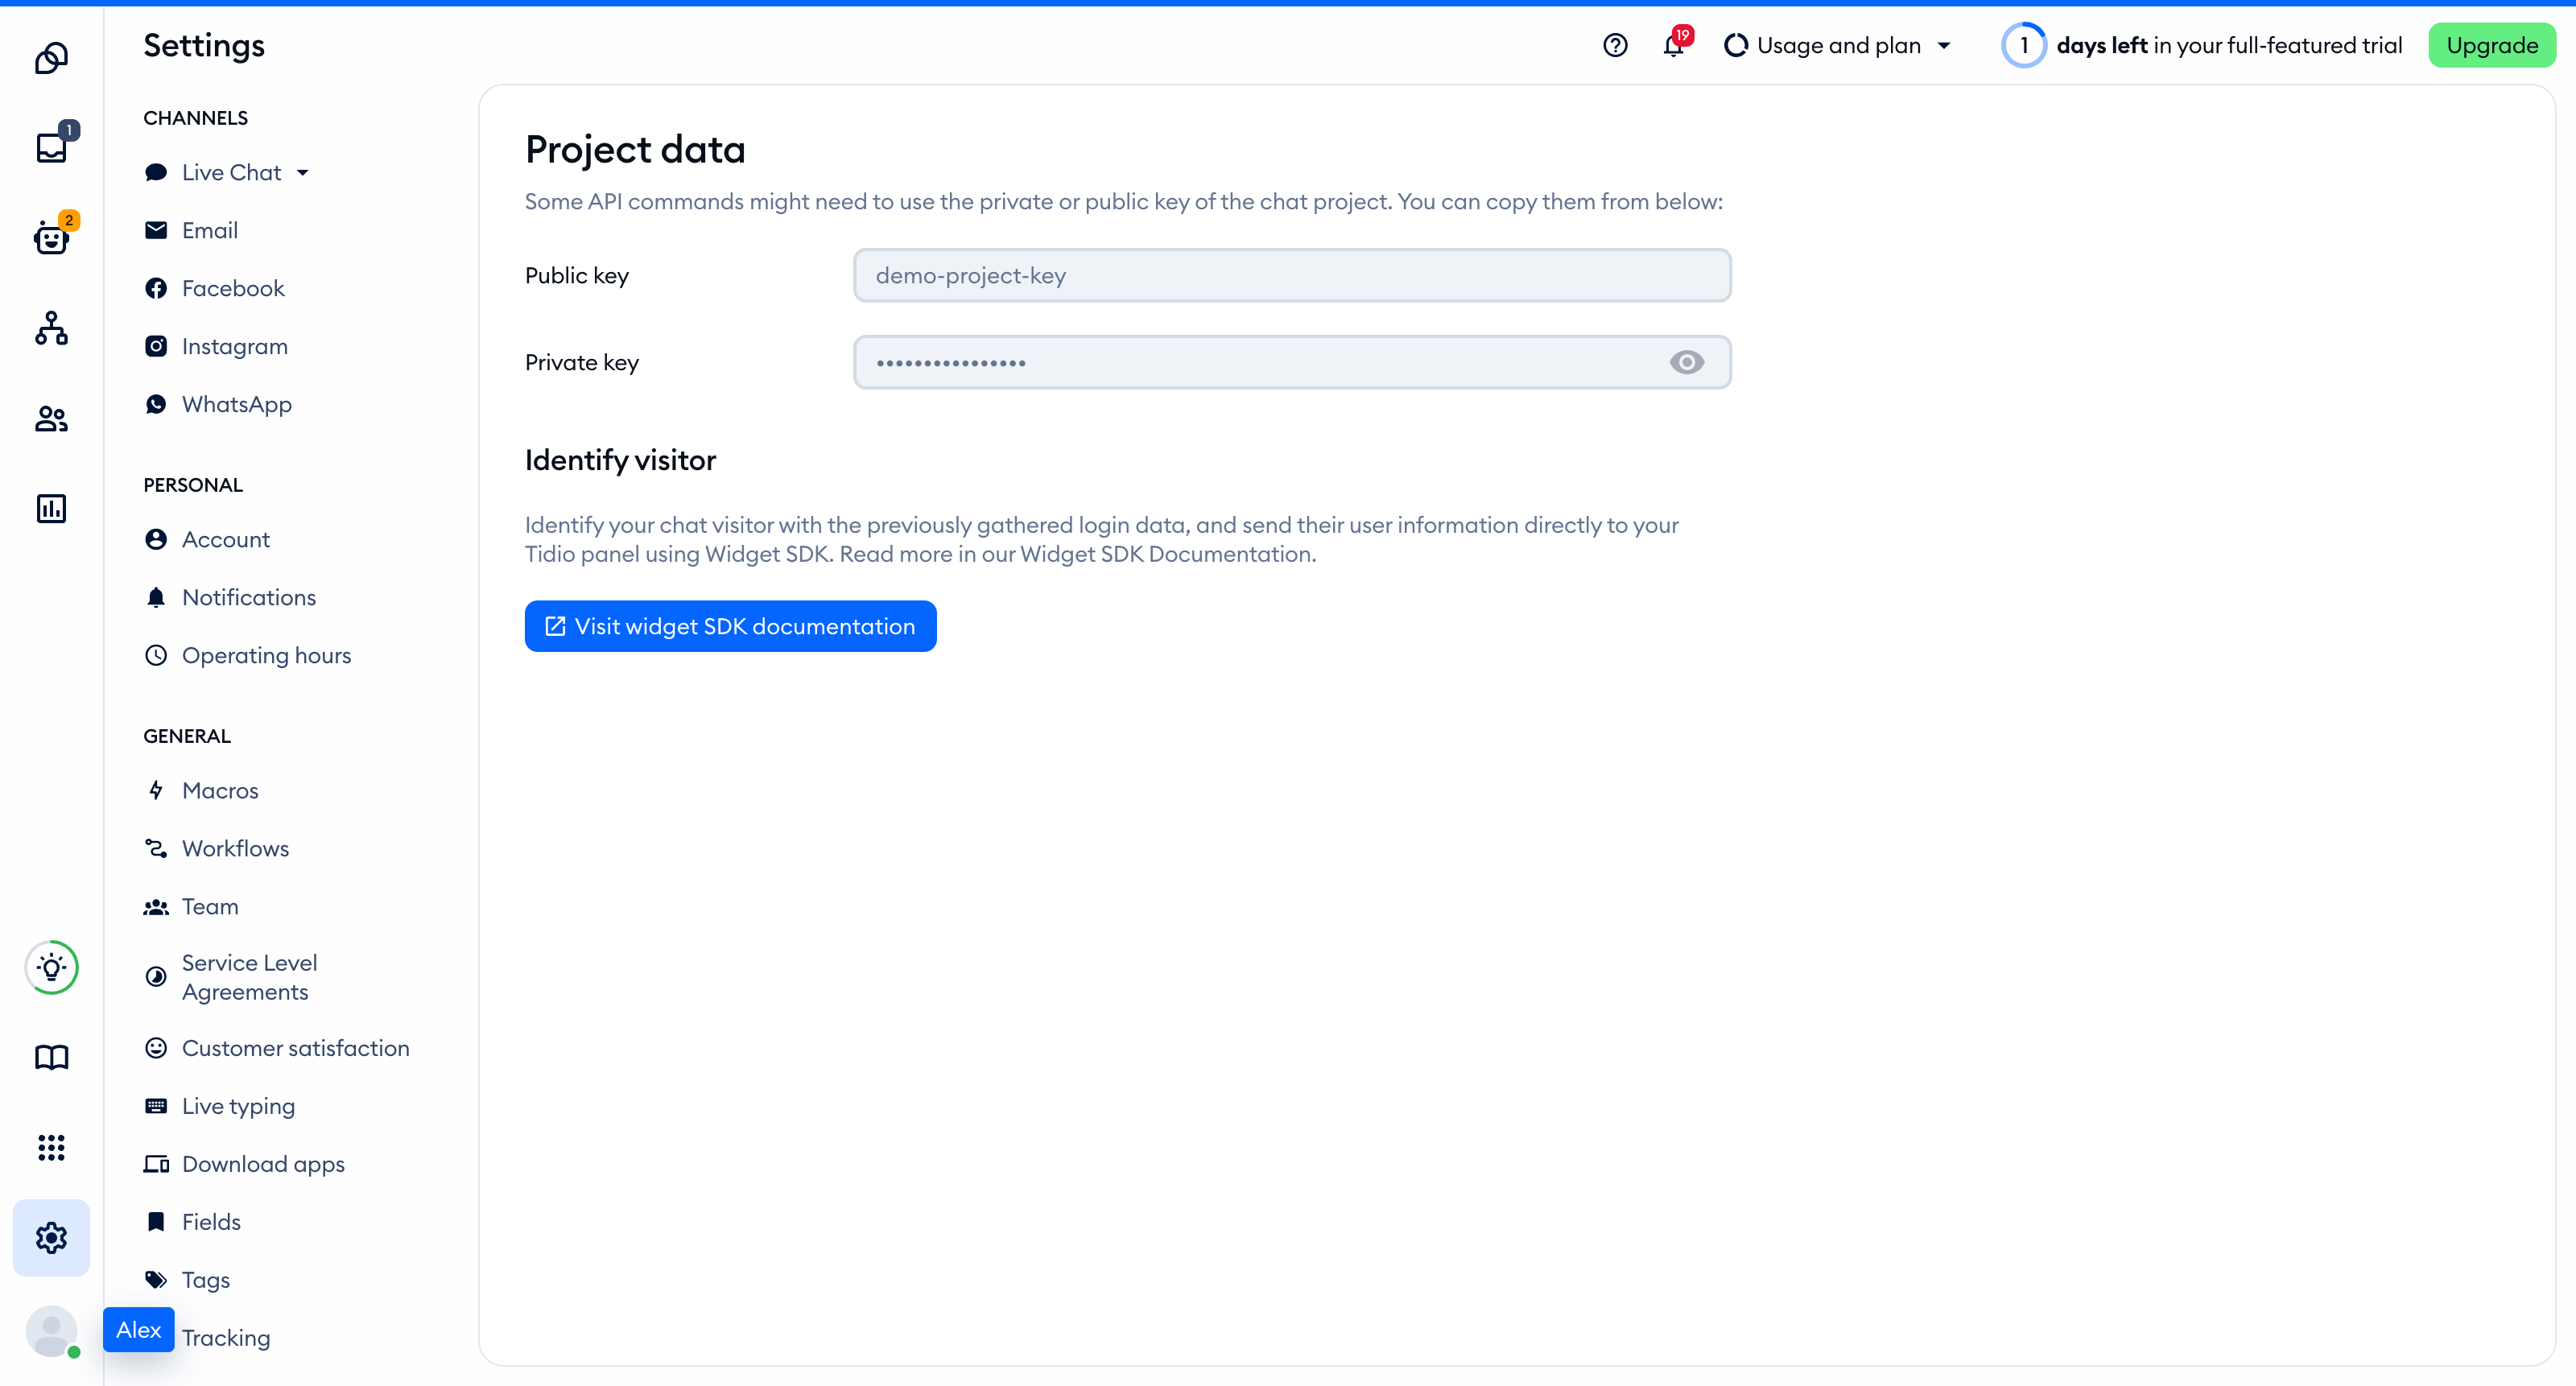
The Public key is part of the script address that every visitor's browser loads, so you can keep it in front-end code. The private key on the same page is different: never put it in your website.
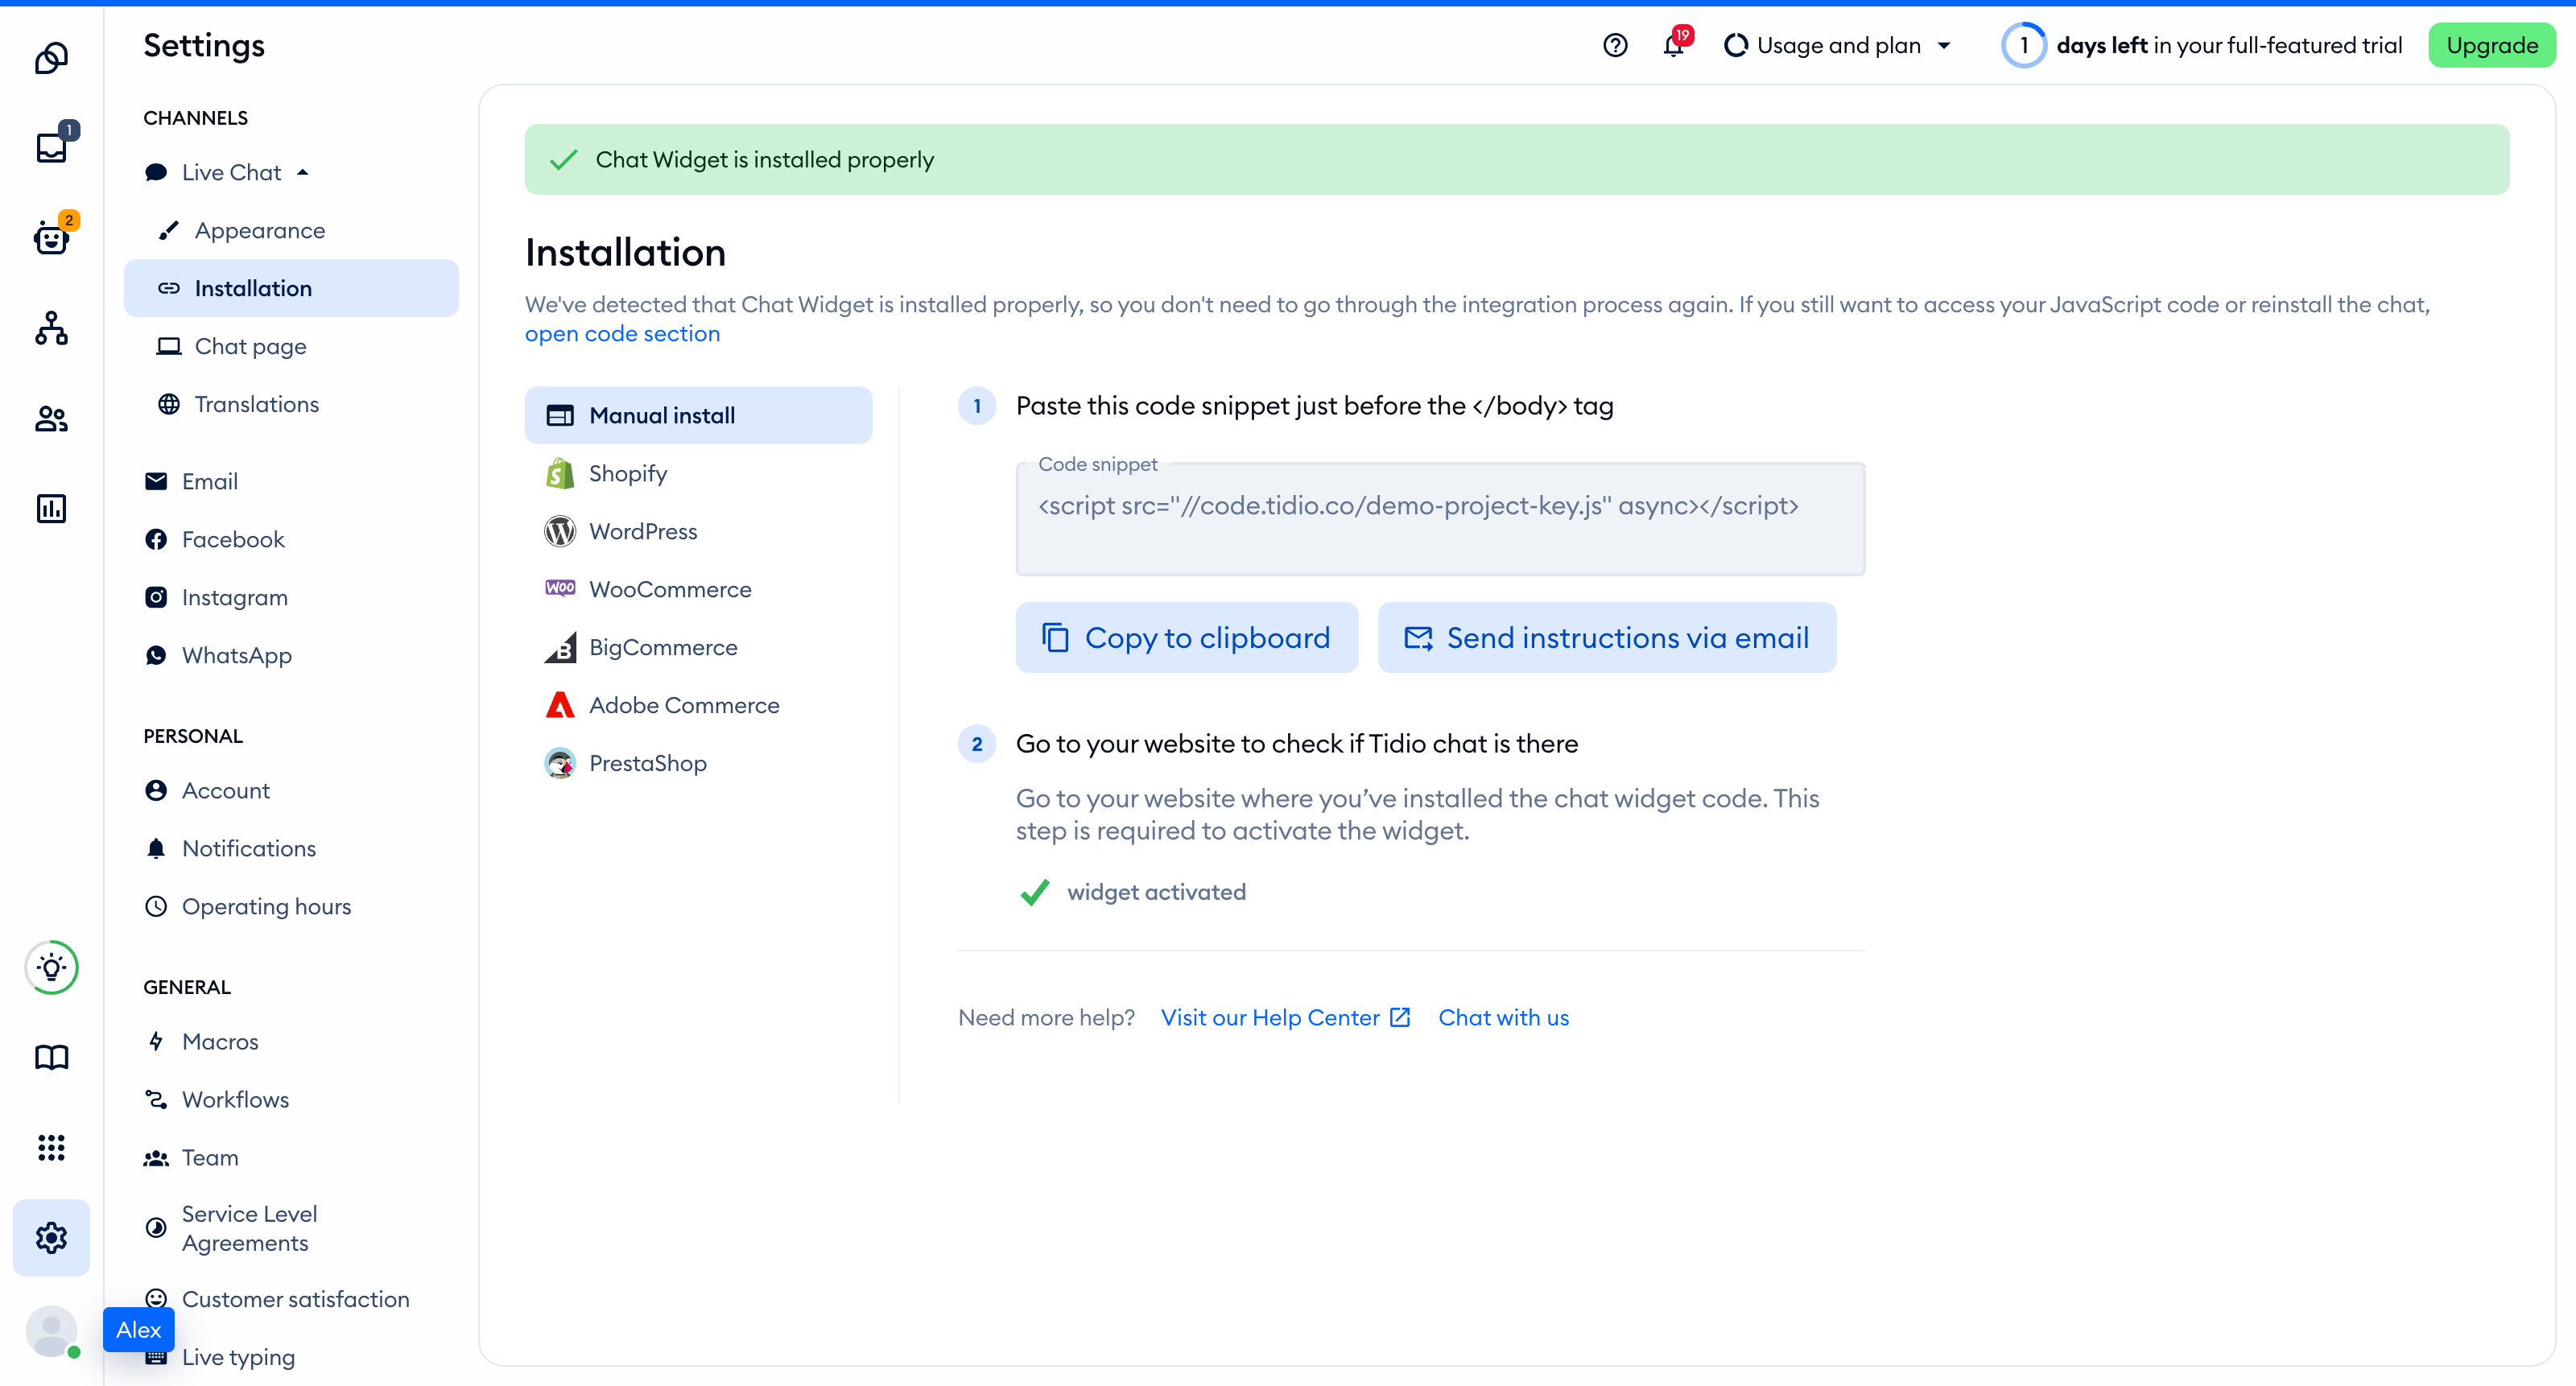
You'll find the same key inside the installation code in **Settings > Live Chat > Installation**, under **Manual install**:
```
```
## Add the widget to Gatsby
Set this value in ` .env.development ` and ` .env.production ` at your project root. Replace ` YOUR_PUBLIC_KEY ` with your Public key:
```
GATSBY_TIDIO_KEY=YOUR_PUBLIC_KEY
```
Gatsby exposes variables with the ` GATSBY_ ` prefix to browser code at build time. Restart development after a change, and rebuild your production site. You can also set the variable in your build environment.
Create ` gatsby-ssr.tsx ` at the project root. If you already export ` onRenderBody `, add the script to that function instead of exporting another one:
```
import * as React from 'react';
import type { GatsbySSR } from 'gatsby';
export const onRenderBody: GatsbySSR['onRenderBody'] = ({ setPostBodyComponents }) => {
setPostBodyComponents([
,
]);
};
```
This produces ` https://code.tidio.co/YOUR_PUBLIC_KEY.js ` with your key in place of the placeholder. Gatsby adds the script after the page content. It stays loaded during client-side navigation through Gatsby's ` Link ` component.
If an AI coding assistant edits this project for you, give it the prompt from [Install Tidio with an AI coding agent](https://help.tidio.com/articles/install-ai-coding-agents/).
## Check the installation
Open your site in a regular browser window. The chat widget appears in the corner of the page and stays there when you move between pages. Headless and automated browsers may not show the widget, so do not rely on them for this check.
Loading a page with the widget is what activates it. After that, **Settings > Live Chat > Installation** in your Tidio panel says **Chat Widget is installed properly**.
[Video](https://help.tidio.com/article-media/install-gatsby/walkthrough.mp4)
Silent walkthrough. A demo Gatsby site with the Tidio chat widget in the corner. The widget stays when the visitor returns to the home page and is hidden on the Checkout page.
## Identify logged-in visitors
Use this loader instead of the script in ` gatsby-ssr.tsx `. Remove that script first. Create ` src/lib/tidio.ts `:
```
export function startTidio(user: { distinct_id?: string; email?: string; name?: string } | null) {
if (document.querySelector('script[src*="code.tidio.co/"]')) return;
if (user) document.tidioIdentify = user;
else delete document.tidioIdentify;
const script = document.createElement('script');
script.src = `https://code.tidio.co/${process.env.GATSBY_TIDIO_KEY}.js`;
script.async = true;
document.body.appendChild(script);
}
```
Add the browser declarations and ready handling from the next section. Import ` startTidio ` from ` ./src/lib/tidio ` in ` gatsby-browser.tsx `. At the end of ` onClientEntry `, call ` startTidio(user) ` after your authentication system resolves the session. Pass your visitor's stable ID and contact details, or ` null ` for an anonymous visitor. If the session loads asynchronously, make this call in its completion callback.
The loader sets ` document.tidioIdentify ` before inserting the script. This lets Tidio merge conversations for the same visitor. Do not put a visitor's identity in the static HTML generated at build time.
For a later login, call this from your login handler after the widget's ready event. It updates visitor data but does not merge conversations:
```
window.tidioChatApi?.setVisitorData({ email: 'contact@mail', name: 'John Doe' });
```
After logout, remove the identification data before resetting the widget:
```
delete document.tidioIdentify;
window.tidioChatApi?.resetVisitor();
```
## Hide the widget on some pages
Add this to ` gatsby-browser.tsx `. Keep your existing imports and merge existing hooks rather than exporting either hook twice. The declarations also provide the types for the identification loader above.
```
import type { GatsbyBrowser } from 'gatsby';
type Visitor = { distinct_id?: string; email?: string; name?: string };
declare global {
interface Document { tidioIdentify?: Visitor }
interface Window {
tidioChatApi?: {
on(event: 'ready', callback: () => void): void;
display(visible: boolean): void;
setVisitorData(visitor: Visitor): void;
resetVisitor(): void;
};
}
}
let ready = false;
function updateVisibility() {
const path = window.location.pathname.replace(/\/$/, '');
window.tidioChatApi?.display(path !== '/checkout');
}
export const onClientEntry: GatsbyBrowser['onClientEntry'] = () => {
const onReady = () => { ready = true; updateVisibility(); };
if (window.tidioChatApi) window.tidioChatApi.on('ready', onReady);
else document.addEventListener('tidioChat-ready', onReady, { once: true });
};
export const onRouteUpdate: GatsbyBrowser['onRouteUpdate'] = () => {
if (ready) updateVisibility();
};
```
The ready handler reads the current address, so a route change before the widget loads does not apply an older page's visibility. After readiness, ` onRouteUpdate ` updates visibility on each navigation. This hides the widget on ` /checkout ` and ` /checkout/ ` and shows it elsewhere. Keep the original server script if you do not need identification.
Hiding the widget does not stop Flows from triggering. To load the widget only on a list of addresses instead, see [Show the widget only on specific pages](https://help.tidio.com/articles/show-widget-only-on-specific-pages/).
## Troubleshooting
- If the script address contains ` undefined ` or ` YOUR_PUBLIC_KEY `, check ` GATSBY_TIDIO_KEY ` in your build environment and rebuild.
- If the widget loads twice, keep either the server script or the identification loader, not both.
- If server rendering reports that ` window ` or ` document ` is undefined, move that access into the browser hooks or your client-side authentication handler.
- If your Content Security Policy blocks Tidio, allow ` code.tidio.co ` in ` script-src ` and check the [full list of required hosts](https://developers.tidio.com/docs/widget-security-policy).
- Check your production build in a regular browser before relying on an automated widget test.
## Further reading
- [Install Tidio on your website](https://help.tidio.com/articles/install-website/)
- [Widget SDK](https://help.tidio.com/articles/widget-sdk/)
- [Install Tidio with an AI coding agent](https://help.tidio.com/articles/install-ai-coding-agents/)
- [Gatsby server rendering APIs](https://www.gatsbyjs.com/docs/reference/config-files/gatsby-ssr/)
- [Gatsby browser APIs](https://www.gatsbyjs.com/docs/reference/config-files/gatsby-browser/)
- [Gatsby environment variables](https://www.gatsbyjs.com/docs/how-to/local-development/environment-variables/)