# Install Tidio with Claude Code
Section: Install Tidio
Description: Connect Claude Code to the Tidio Help Center, add the chat widget to your repository, and save project instructions for future edits.
Verified against Tidio panel 12.331.0
Last updated: 2026-11-18
Source: https://help.tidio.com/articles/install-claude-code/
Use Claude Code to add the Tidio chat widget to your repository. Connect the Tidio Help Center first, then give Claude a prompt that limits the edit to your widget installation.
**In this article, you'll learn:**
- [How to find your Public key](https://help.tidio.com/articles/install-claude-code/#public-key)
- [How to connect the Tidio Help Center](https://help.tidio.com/articles/install-claude-code/#docs-for-ai)
- [How to ask Claude Code to add the widget](https://help.tidio.com/articles/install-claude-code/#prompt)
- [How to keep the rule in your project](https://help.tidio.com/articles/install-claude-code/#keep-instructions)
- [How to check the installation](https://help.tidio.com/articles/install-claude-code/#check)
- [How to troubleshoot the installation](https://help.tidio.com/articles/install-claude-code/#troubleshooting)
[Video](https://help.tidio.com/article-media/install-claude-code/walkthrough.mp4)
Silent walkthrough. Open Developer settings and select your project's Public key.
## Find your Public key
Log in to your Tidio panel and go to **Settings > Developer > Project data**. Click the **Public key** field to select its value, then copy it.
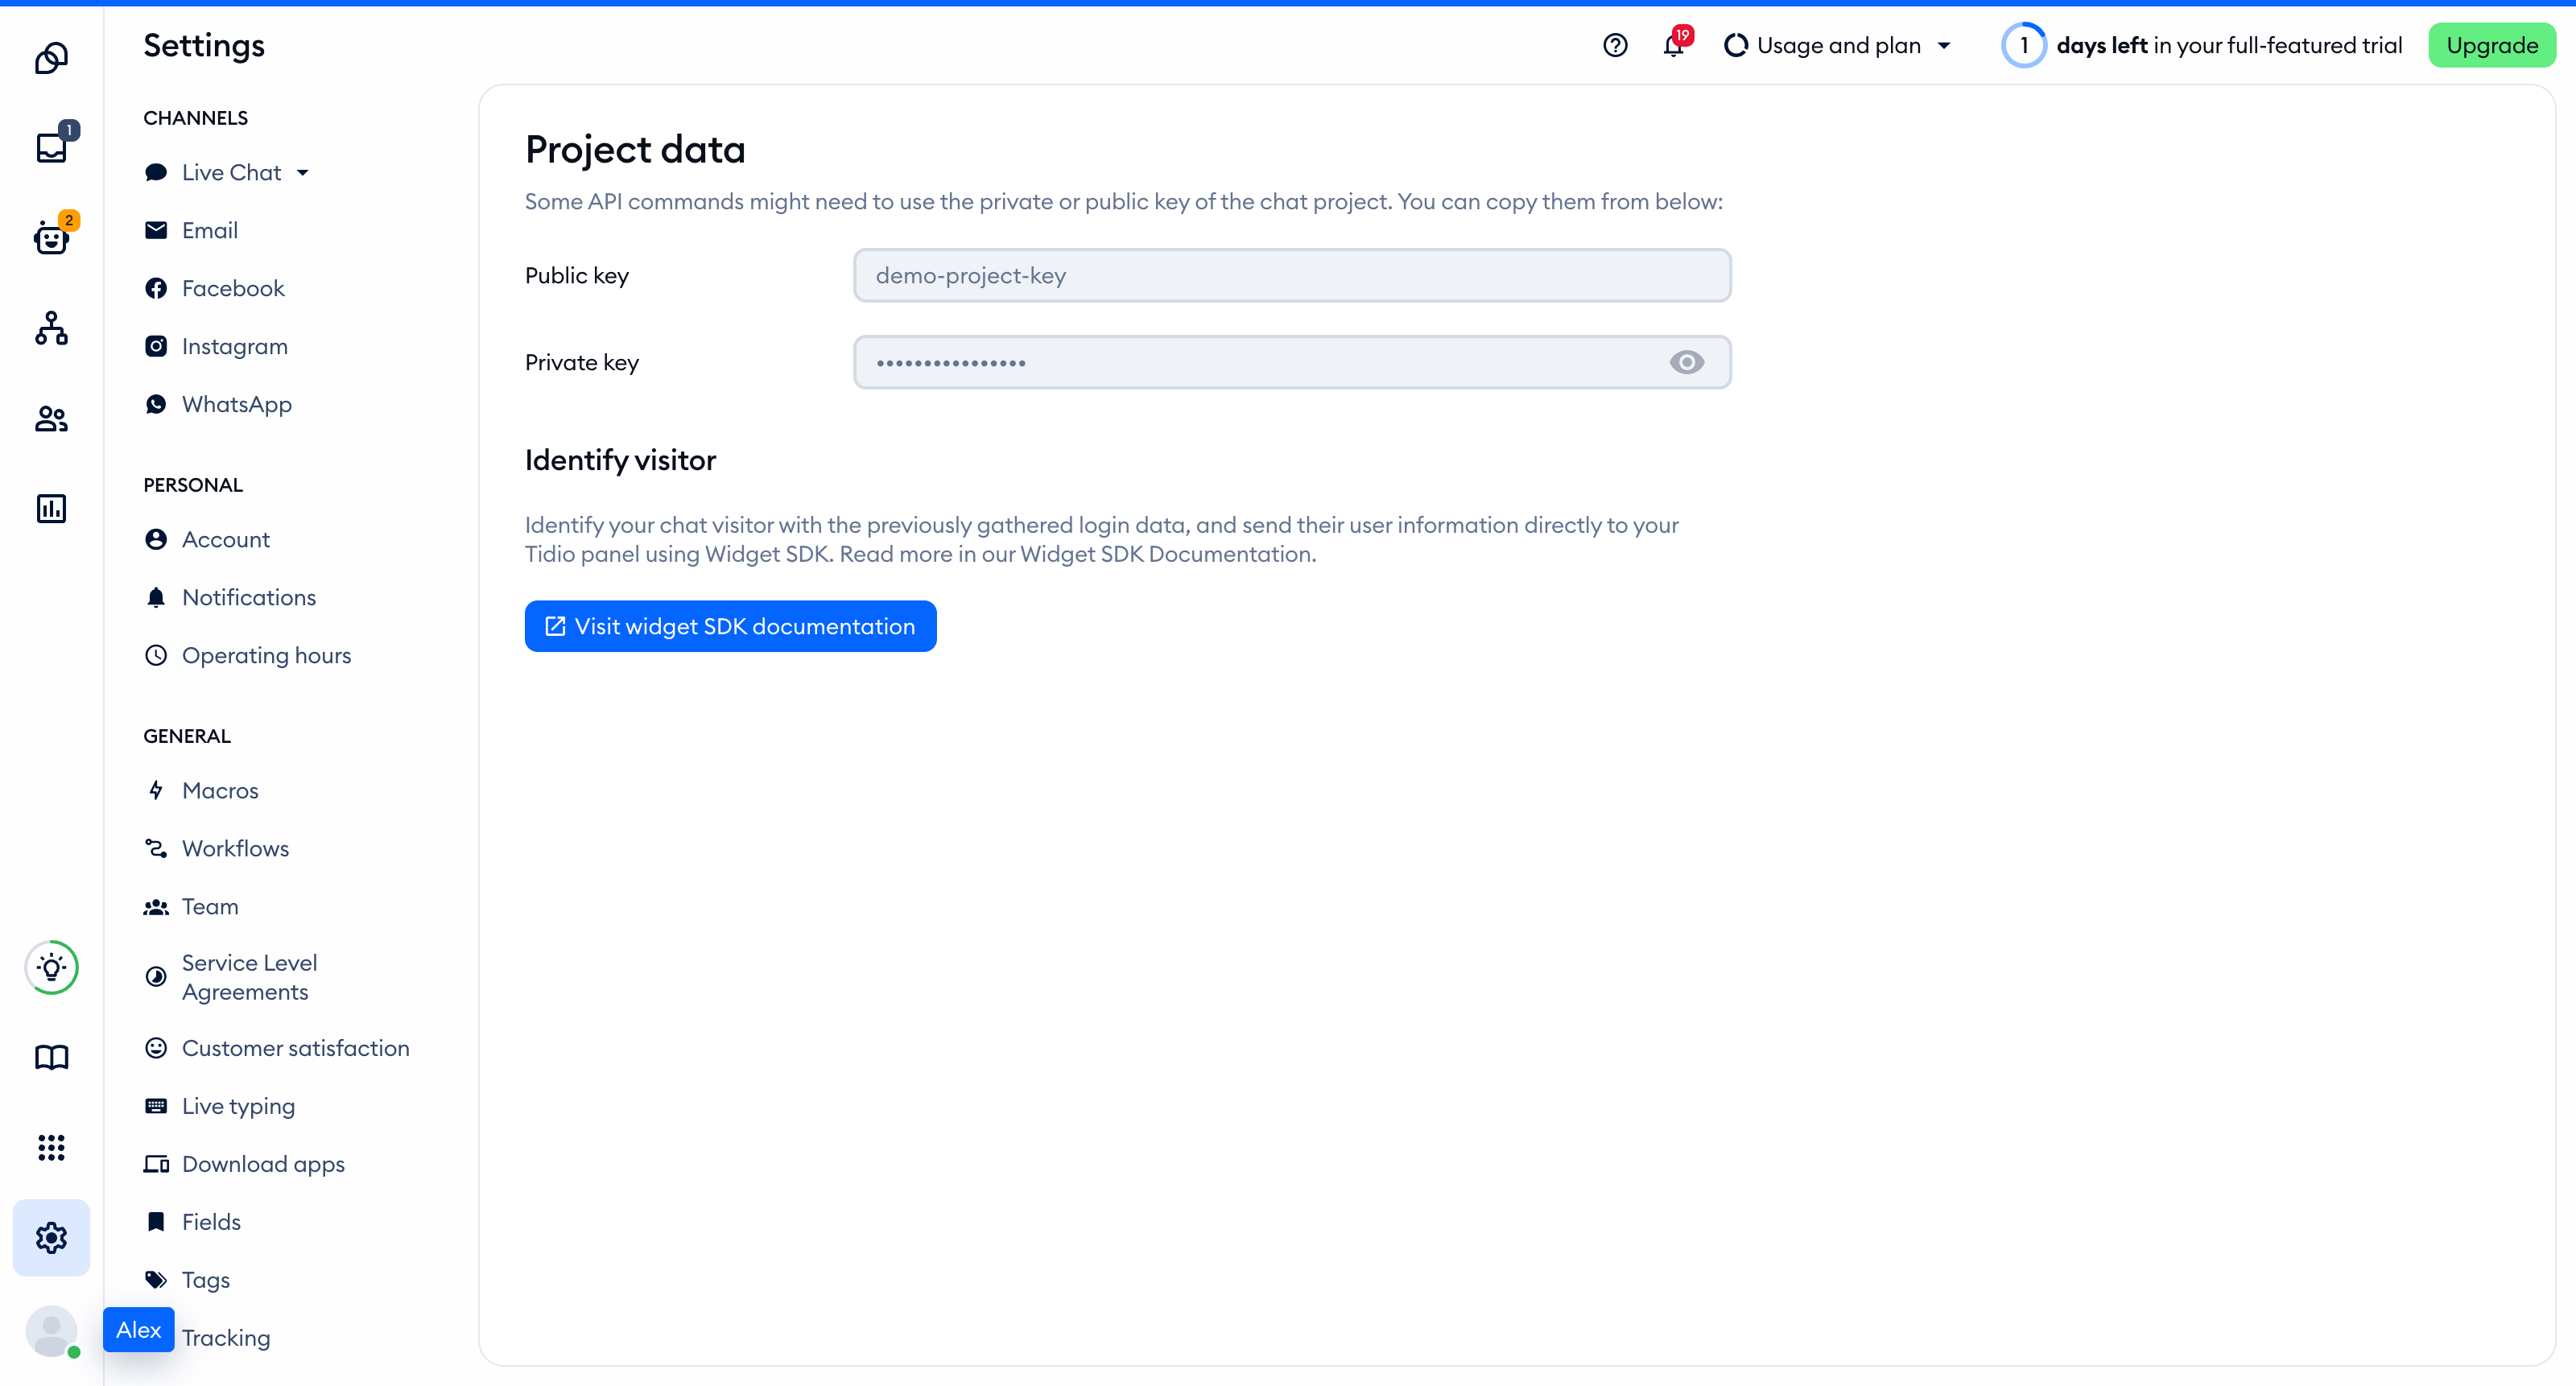
The Public key is part of the script address that every visitor's browser loads, so you can keep it in front-end code. The private key on the same page is different: never put it in your website.
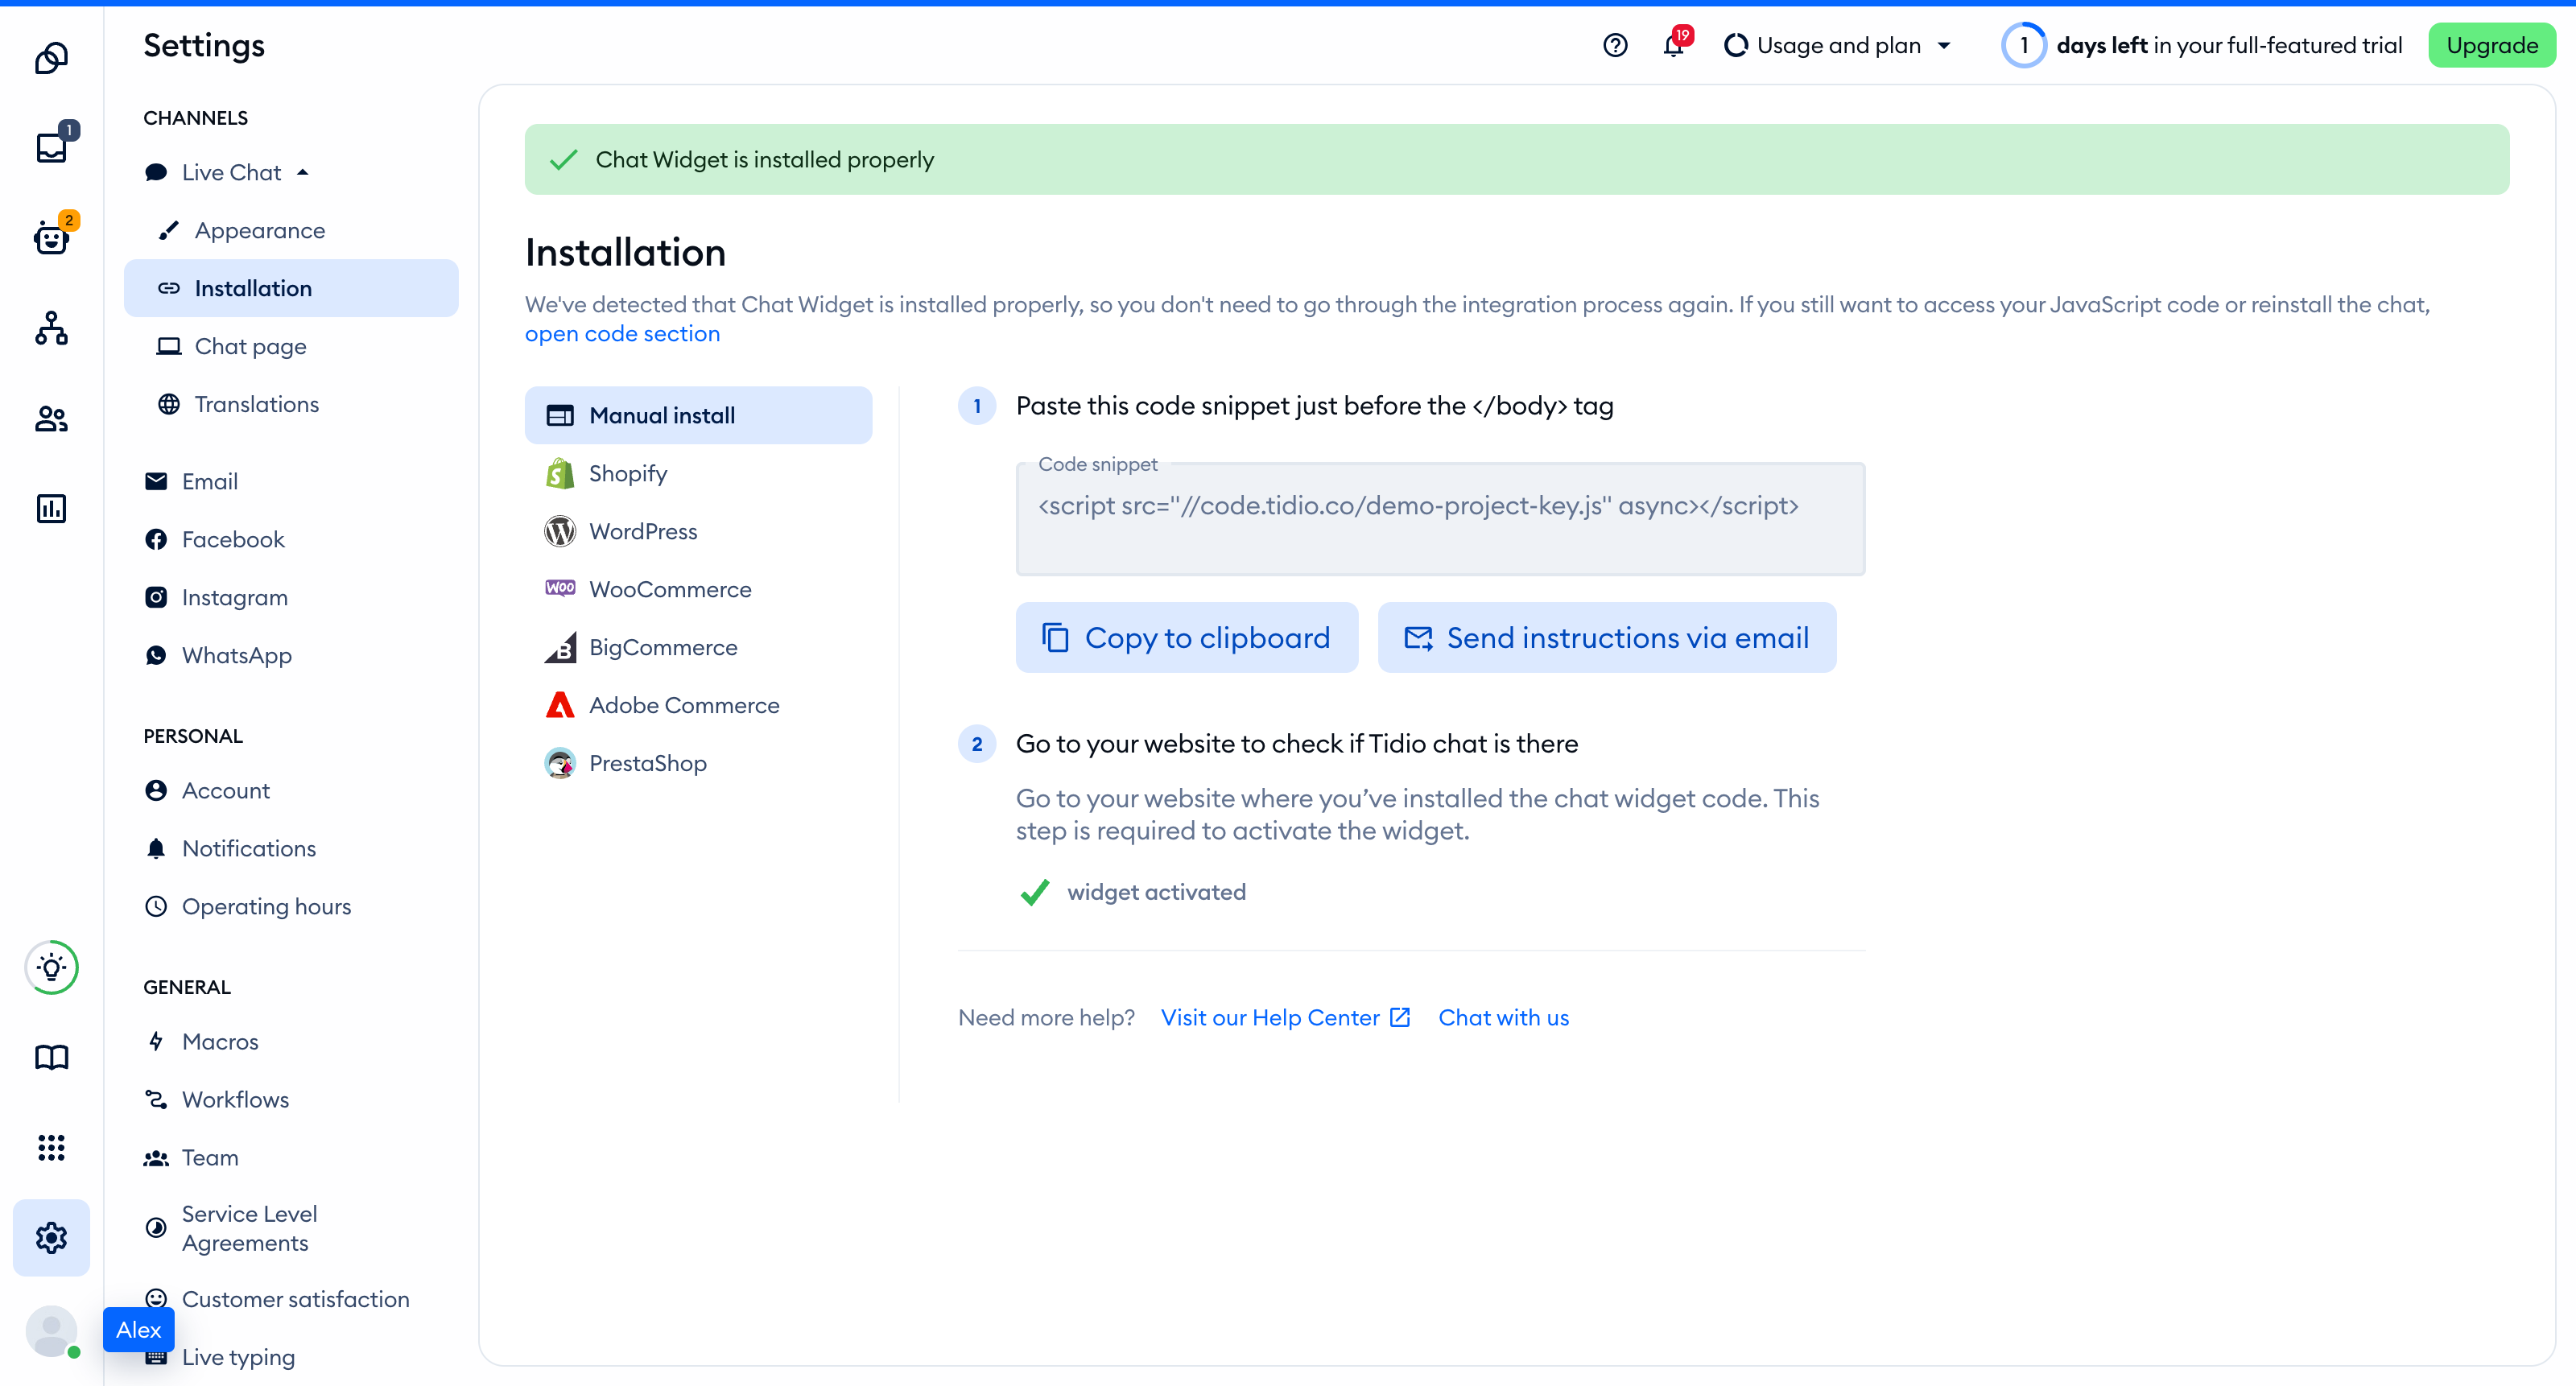
You'll find the same key inside the installation code in **Settings > Live Chat > Installation**, under **Manual install**:
```
```
## Connect the Tidio Help Center
The Tidio Help Center has a read-only MCP server at ` https://help.tidio.com/mcp `. It uses Streamable HTTP and requires no login. It lets Claude search and read the installation guides before editing your code.
In a terminal, from your project directory, run:
```
claude mcp add --transport http tidio-help-center https://help.tidio.com/mcp
```
This uses local scope, so the server is available only to you in the current project. To choose a different scope, use one of these alternatives instead:
- For a team-shared configuration, add ` --scope project `. Claude Code stores it in ` .mcp.json ` at the project root. Interactive sessions ask you to approve project-scoped servers before using them.
- For your own use across projects, add ` --scope user `. Claude Code stores it in your user configuration.
Inside Claude Code, run ` /mcp ` to check the server status. The Tidio server provides ` search_articles `, ` get_article `, ` list_articles `, ` list_sections `, and ` get_section `.
If MCP is unavailable, give Claude ` https://help.tidio.com/llms.txt ` as the documentation index. If Claude cannot fetch it, paste the matching guide into the conversation instead.
## Ask Claude Code to add the widget
Replace ` YOUR_PUBLIC_KEY ` with your Public key, then paste this prompt into Claude Code:
```
Before editing, read the matching framework guide from the Tidio Help Center MCP server: use search_articles, then get_article.
Add the Tidio live chat widget to this project.
1. Load this script once on every page, at the end of the body, with async:
2. Put it in the root HTML document or the root layout, so it loads once and stays loaded during client-side navigation. Do not add it to single pages or to a component that mounts more than once.
3. Do not install an npm package for Tidio. The script tag is the whole installation.
4. Do not use window.tidioChatApi on the server. Use it only in the browser, after the "tidioChat-ready" event fires on document.
5. Change nothing else, then tell me which file you edited.
Reference: https://help.tidio.com/articles/install-ai-coding-agents/
```
When using the fallback instead of MCP, replace the first line with an instruction to read the framework guide you supplied. Review the changed file before deploying.
For the exact code to review or add yourself, choose your framework guide:
- [Next.js](https://help.tidio.com/articles/install-nextjs/)
- [React](https://help.tidio.com/articles/install-react/)
- [React Router and Remix](https://help.tidio.com/articles/install-react-router/)
- [TanStack Start](https://help.tidio.com/articles/install-tanstack-start/)
- [Vue](https://help.tidio.com/articles/install-vue/)
- [Nuxt](https://help.tidio.com/articles/install-nuxt/)
- [SvelteKit](https://help.tidio.com/articles/install-sveltekit/)
- [Astro](https://help.tidio.com/articles/install-astro/)
- [Angular](https://help.tidio.com/articles/install-angular/)
- [Gatsby](https://help.tidio.com/articles/install-gatsby/)
- [SolidStart](https://help.tidio.com/articles/install-solidstart/)
- [Qwik](https://help.tidio.com/articles/install-qwik/)
- [Eleventy](https://help.tidio.com/articles/install-eleventy/)
## Keep the rule in your project
Claude Code reads project instructions from ` CLAUDE.md `. Add these two lines to that file at your project root, preserving any existing instructions:
```
Before changing the Tidio integration, read the matching framework guide from the Tidio Help Center MCP server, or use https://help.tidio.com/llms.txt if MCP is unavailable.
Keep the Tidio script in one root document or layout, use only the Public key, and do not add an npm package for Tidio.
```
These instructions provide context for future sessions. They do not replace reviewing Claude's changes.
## Check the installation
Open your site in a regular browser window. The chat widget appears in the corner of the page and stays there when you move between pages. Headless and automated browsers may not show the widget, so do not rely on them for this check.
Loading a page with the widget is what activates it. After that, **Settings > Live Chat > Installation** in your Tidio panel says **Chat Widget is installed properly**.
Check the deployed site, then move to another page and back to check that navigation does not add another widget script.
## Troubleshoot the installation
- If Claude cannot find the Help Center tools, check ` /mcp ` and confirm the server address is ` https://help.tidio.com/mcp `. Use the documentation index fallback if you cannot connect.
- If the widget does not load, check that you replaced ` YOUR_PUBLIC_KEY ` and copied the whole Public key.
- If you see two widgets or duplicate script requests, ask Claude to remove the extra installation rather than adding another script.
- If server rendering reports that ` window ` or ` document ` is undefined, ask Claude to move browser-only code to the framework's client-side lifecycle.
- If your Content Security Policy blocks Tidio, allow ` code.tidio.co ` in ` script-src ` and add the other hosts from the [Content Security Policy](https://developers.tidio.com/docs/widget-security-policy) page of the developer documentation.
- If an automated check cannot see the widget, repeat the check in a regular browser window.
## Further reading
- [Install Tidio with an AI coding agent](https://help.tidio.com/articles/install-ai-coding-agents/)
- [Install Tidio on your website](https://help.tidio.com/articles/install-website/)
- [Widget SDK](https://help.tidio.com/articles/widget-sdk/)
- [Claude Code MCP documentation](https://code.claude.com/docs/en/mcp)
- [Claude Code project instructions](https://code.claude.com/docs/en/memory)